Locations Overview
Last Updated: April 15, 2026
Document ID: UG-LOCATIONS-001
Version: 1.0
Overview
The Locations feature is a powerful mapping tool that allows you to visualize, document, and manage field-relevant locations for your clients. This tool helps you with outreach, safety planning, and field coordination by providing an interactive map where you can pin important client locations with detailed notes.
Dual Access Points:
- Locations Page (from navigation bar) - Browse and map locations across ALL cases in your caseload; view multiple clients with multiple locations per case for fieldwork planning
- Case Page Access (from Health Record accordion) - Filtered view showing only locations for a specific client for case-specific context
This guide will cover:
- Understanding the two ways to access Locations
- Understanding the Locations interface layout
- Adding new location pins with notes
- Viewing and managing saved locations
- Organizing fieldwork with multiple client pins
- Using visibility toggles for planning
Key Terms
| Term | Definition |
|---|---|
| Locations Page | Standalone navigation feature showing all location pins across all cases in your caseload |
| Locations Pop-up | Interface that appears when accessing Locations (full-page from navigation bar or overlay from Case Page) |
| Location Pin | Map marker indicating a specific address or place associated with a client |
| Map Panel | Left side of interface showing interactive map with zoom/pan controls |
| Accordion Panel | Right side of interface listing all location pins by client, with expand/collapse functionality |
| Location+ Button | Green icon that activates "Add Location" mode when orange |
| Visibility Toggle | Eye icon used to hide/show location pins on the map |
| Select Case | Dropdown when adding location to choose which client the pin belongs to (defaults to current case) |
Layout Overview: Default View (No Locations)
When you first open the Locations interface (from either access point) with no saved locations:
Map Panel (Left Side)
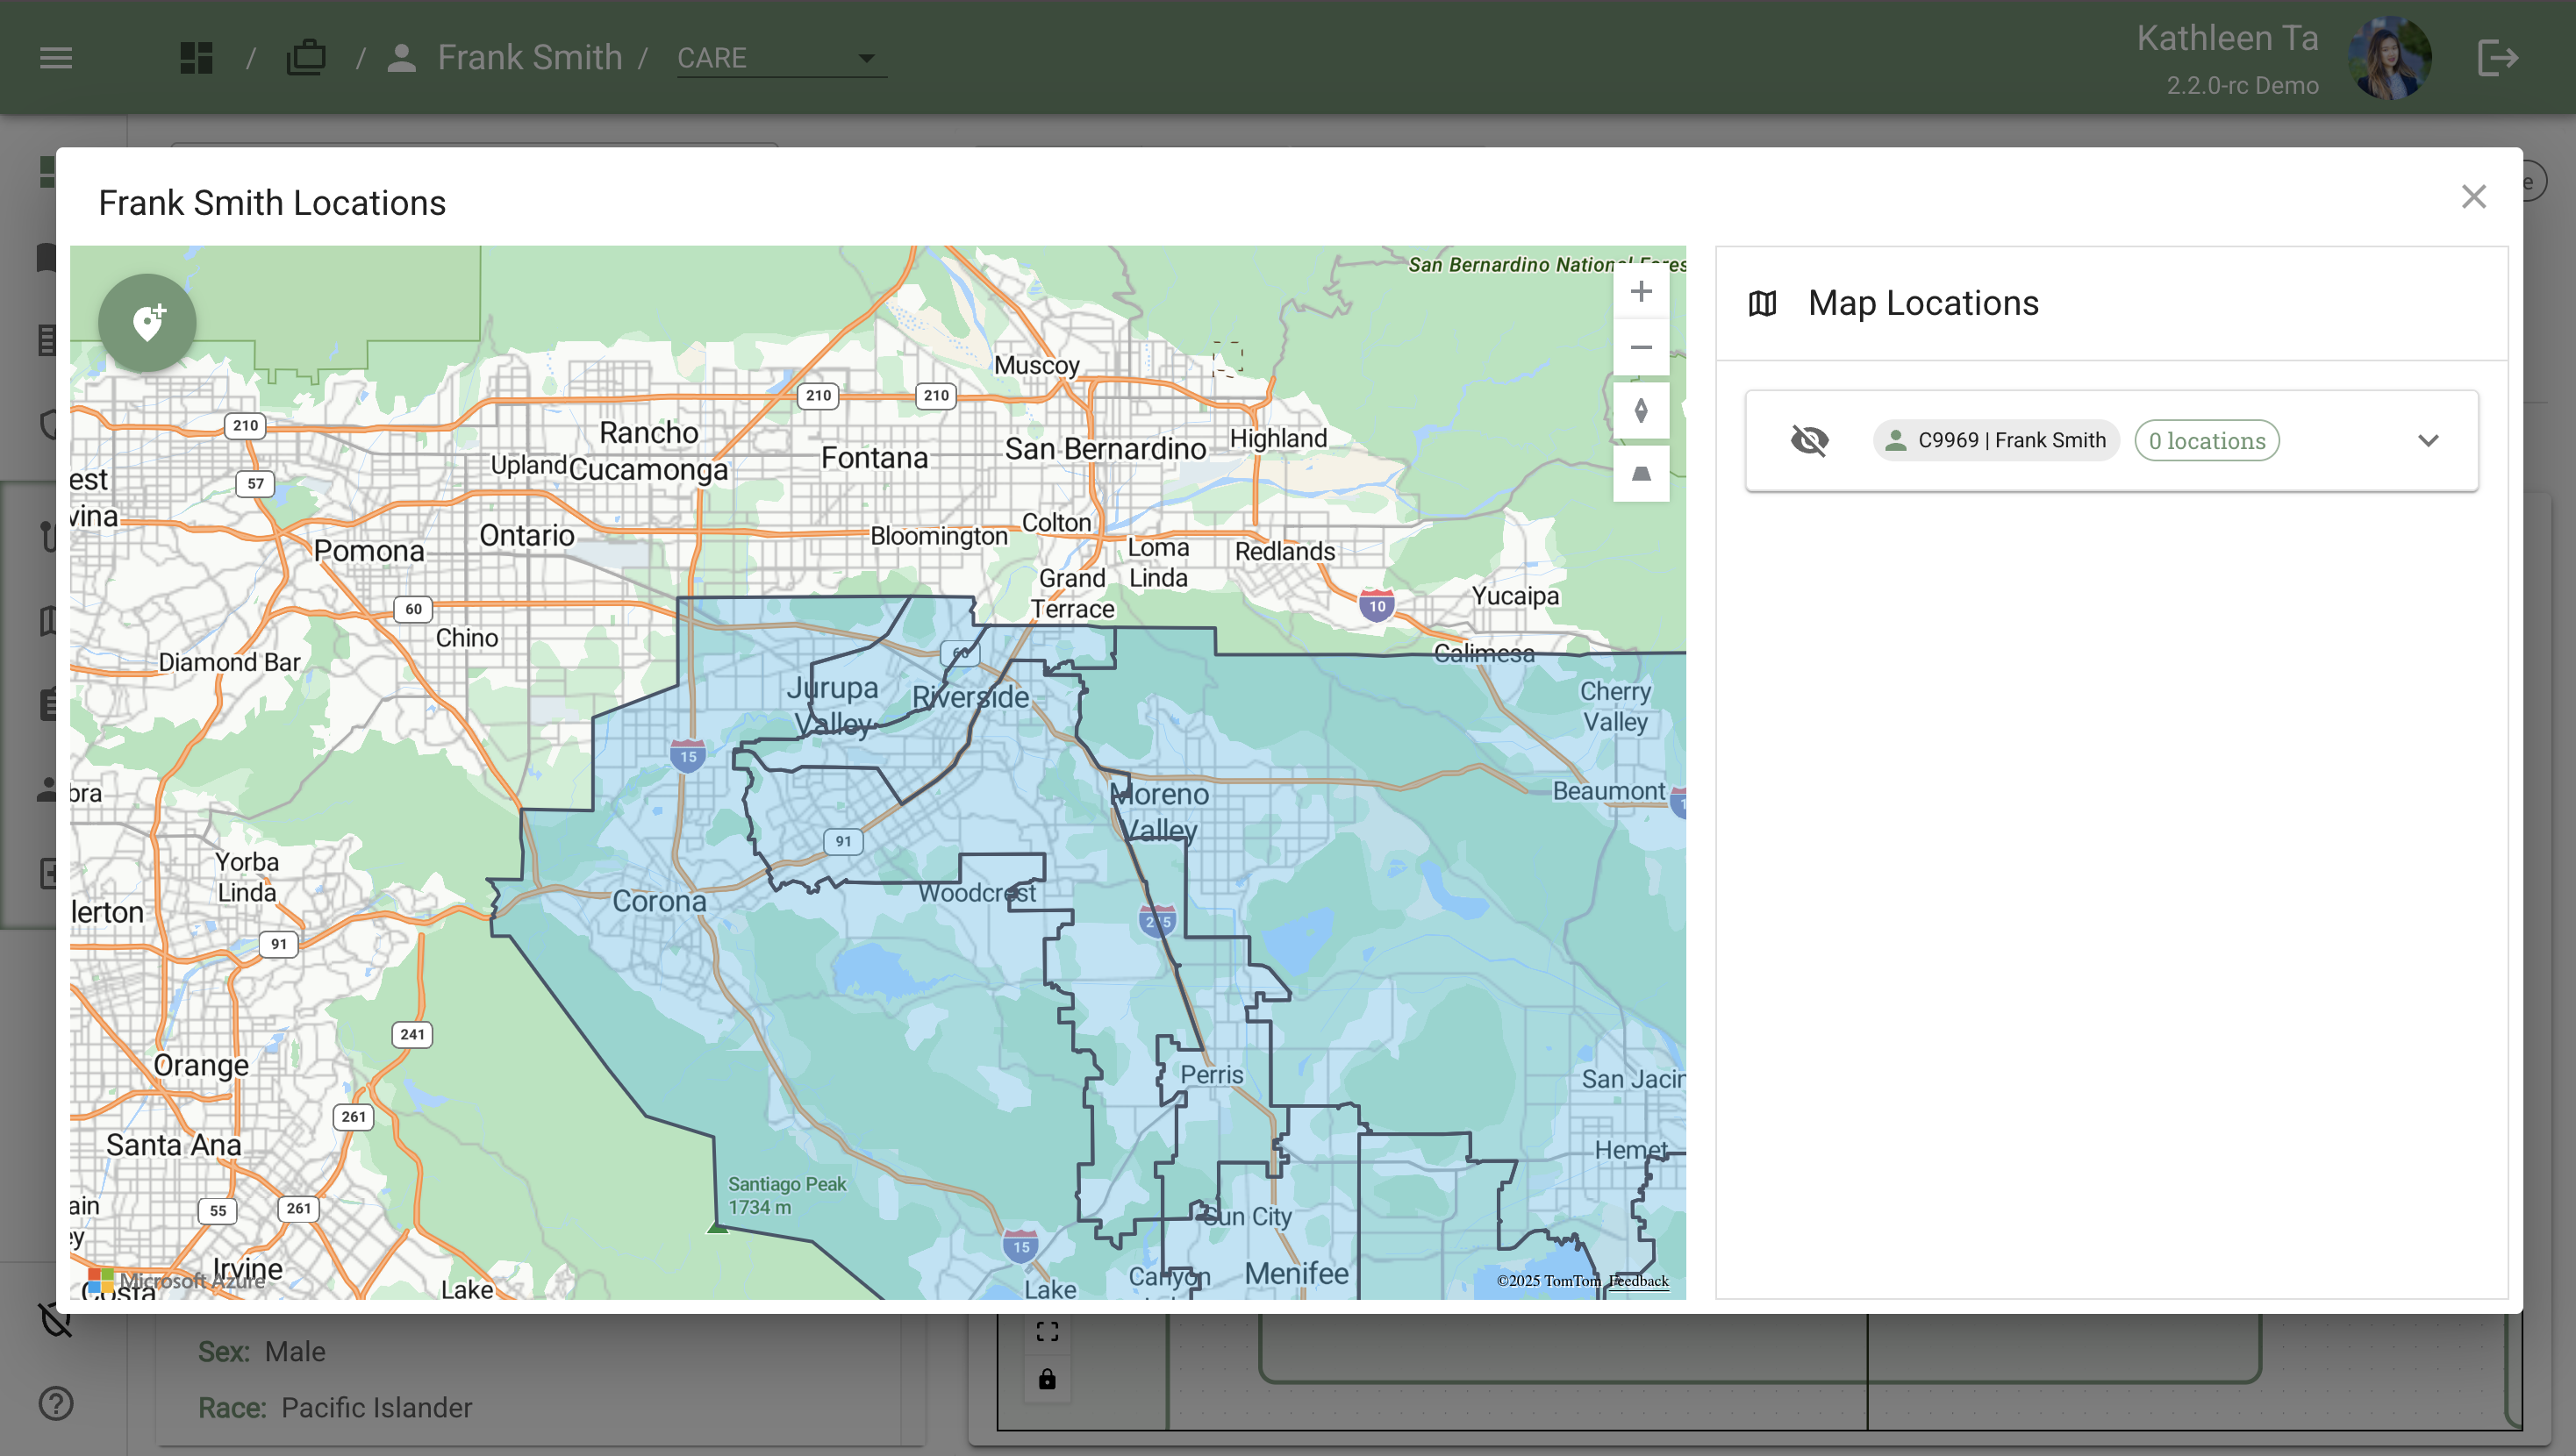
What you see:
-
Interactive map centered on a default region
-
Jurisdictional boundaries shown with:
- Blue highlighted/shaded regions
- Border lines
- Likely represents County-level service areas (County associated with the client) Map Controls:
-
Zoom: Point your cursor into the map area and scroll with your mouse wheel
- Scroll up = Zoom in
- Scroll down = Zoom out (reversed on Mac)
-
Pan: Click and drag to move the map view
-
Fully interactive—no limit to zoom level or pan range
Map Locations Panel (Right Side)
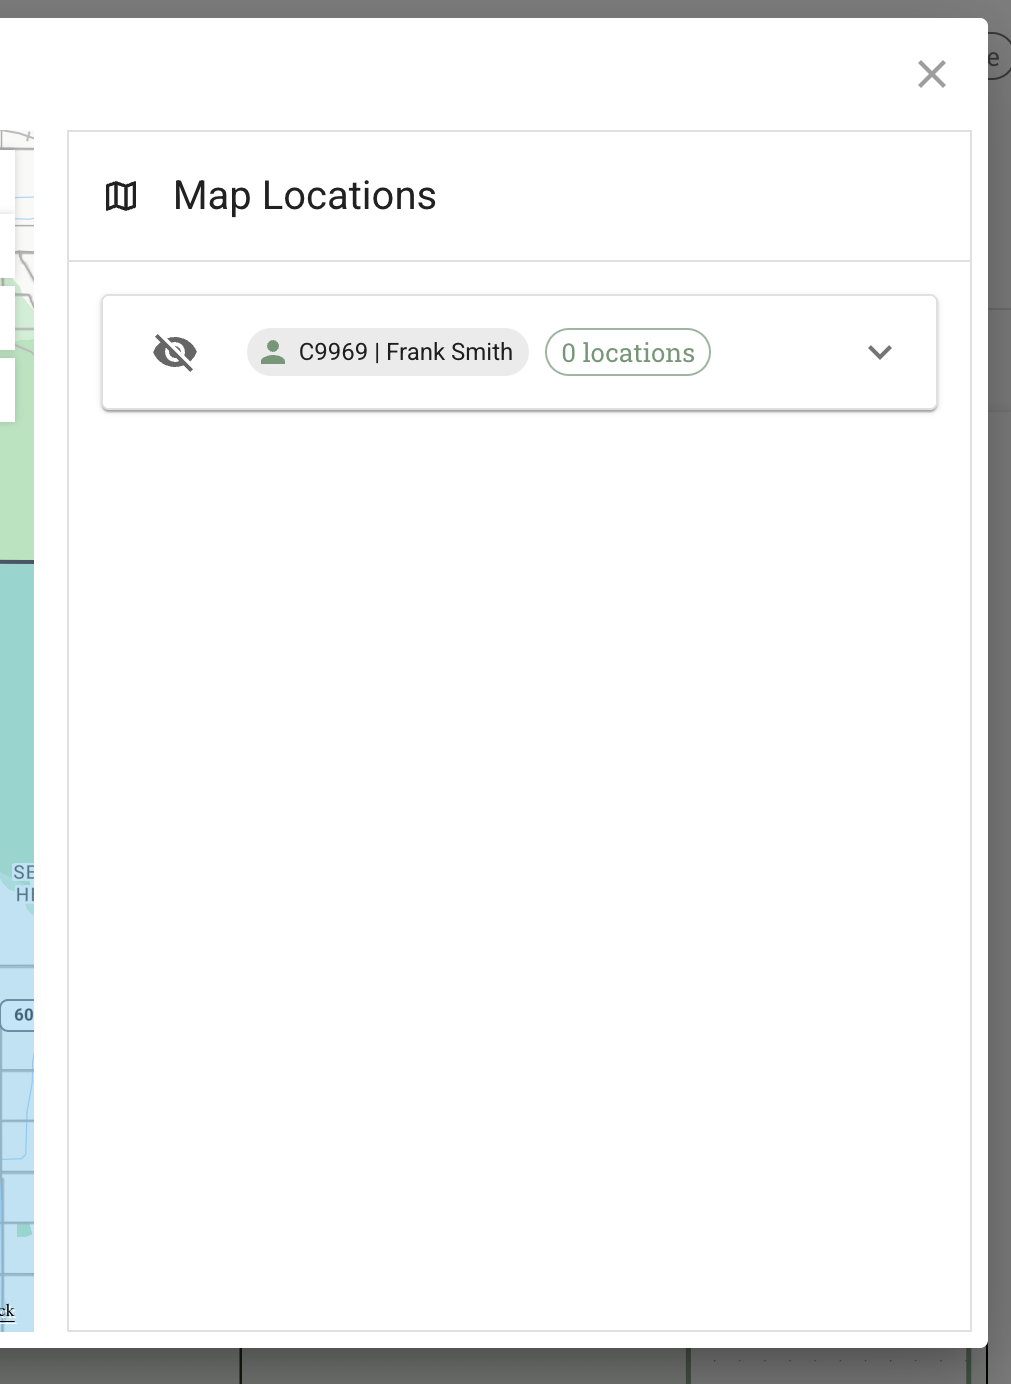
What you see when accessed from Navigation Bar (All Cases):
- List of all clients in your caseload with saved locations
- "0 locations" tag for clients with no pins yet
- Empty accordion area if no locations have been saved for any client
What you see when accessed from Case Page (Filtered View):
- Current client name and ID at the top
- "0 locations" tag indicating no saved pins for this client
- Empty accordion area (no locations to display for this client)
Purpose: This panel lists all location pins. When accessed from the navigation bar, it shows multiple clients; when accessed from a Case Page, it's filtered to just that client.
Adding a New Location Pin
Step 1: Activate Add Location Mode
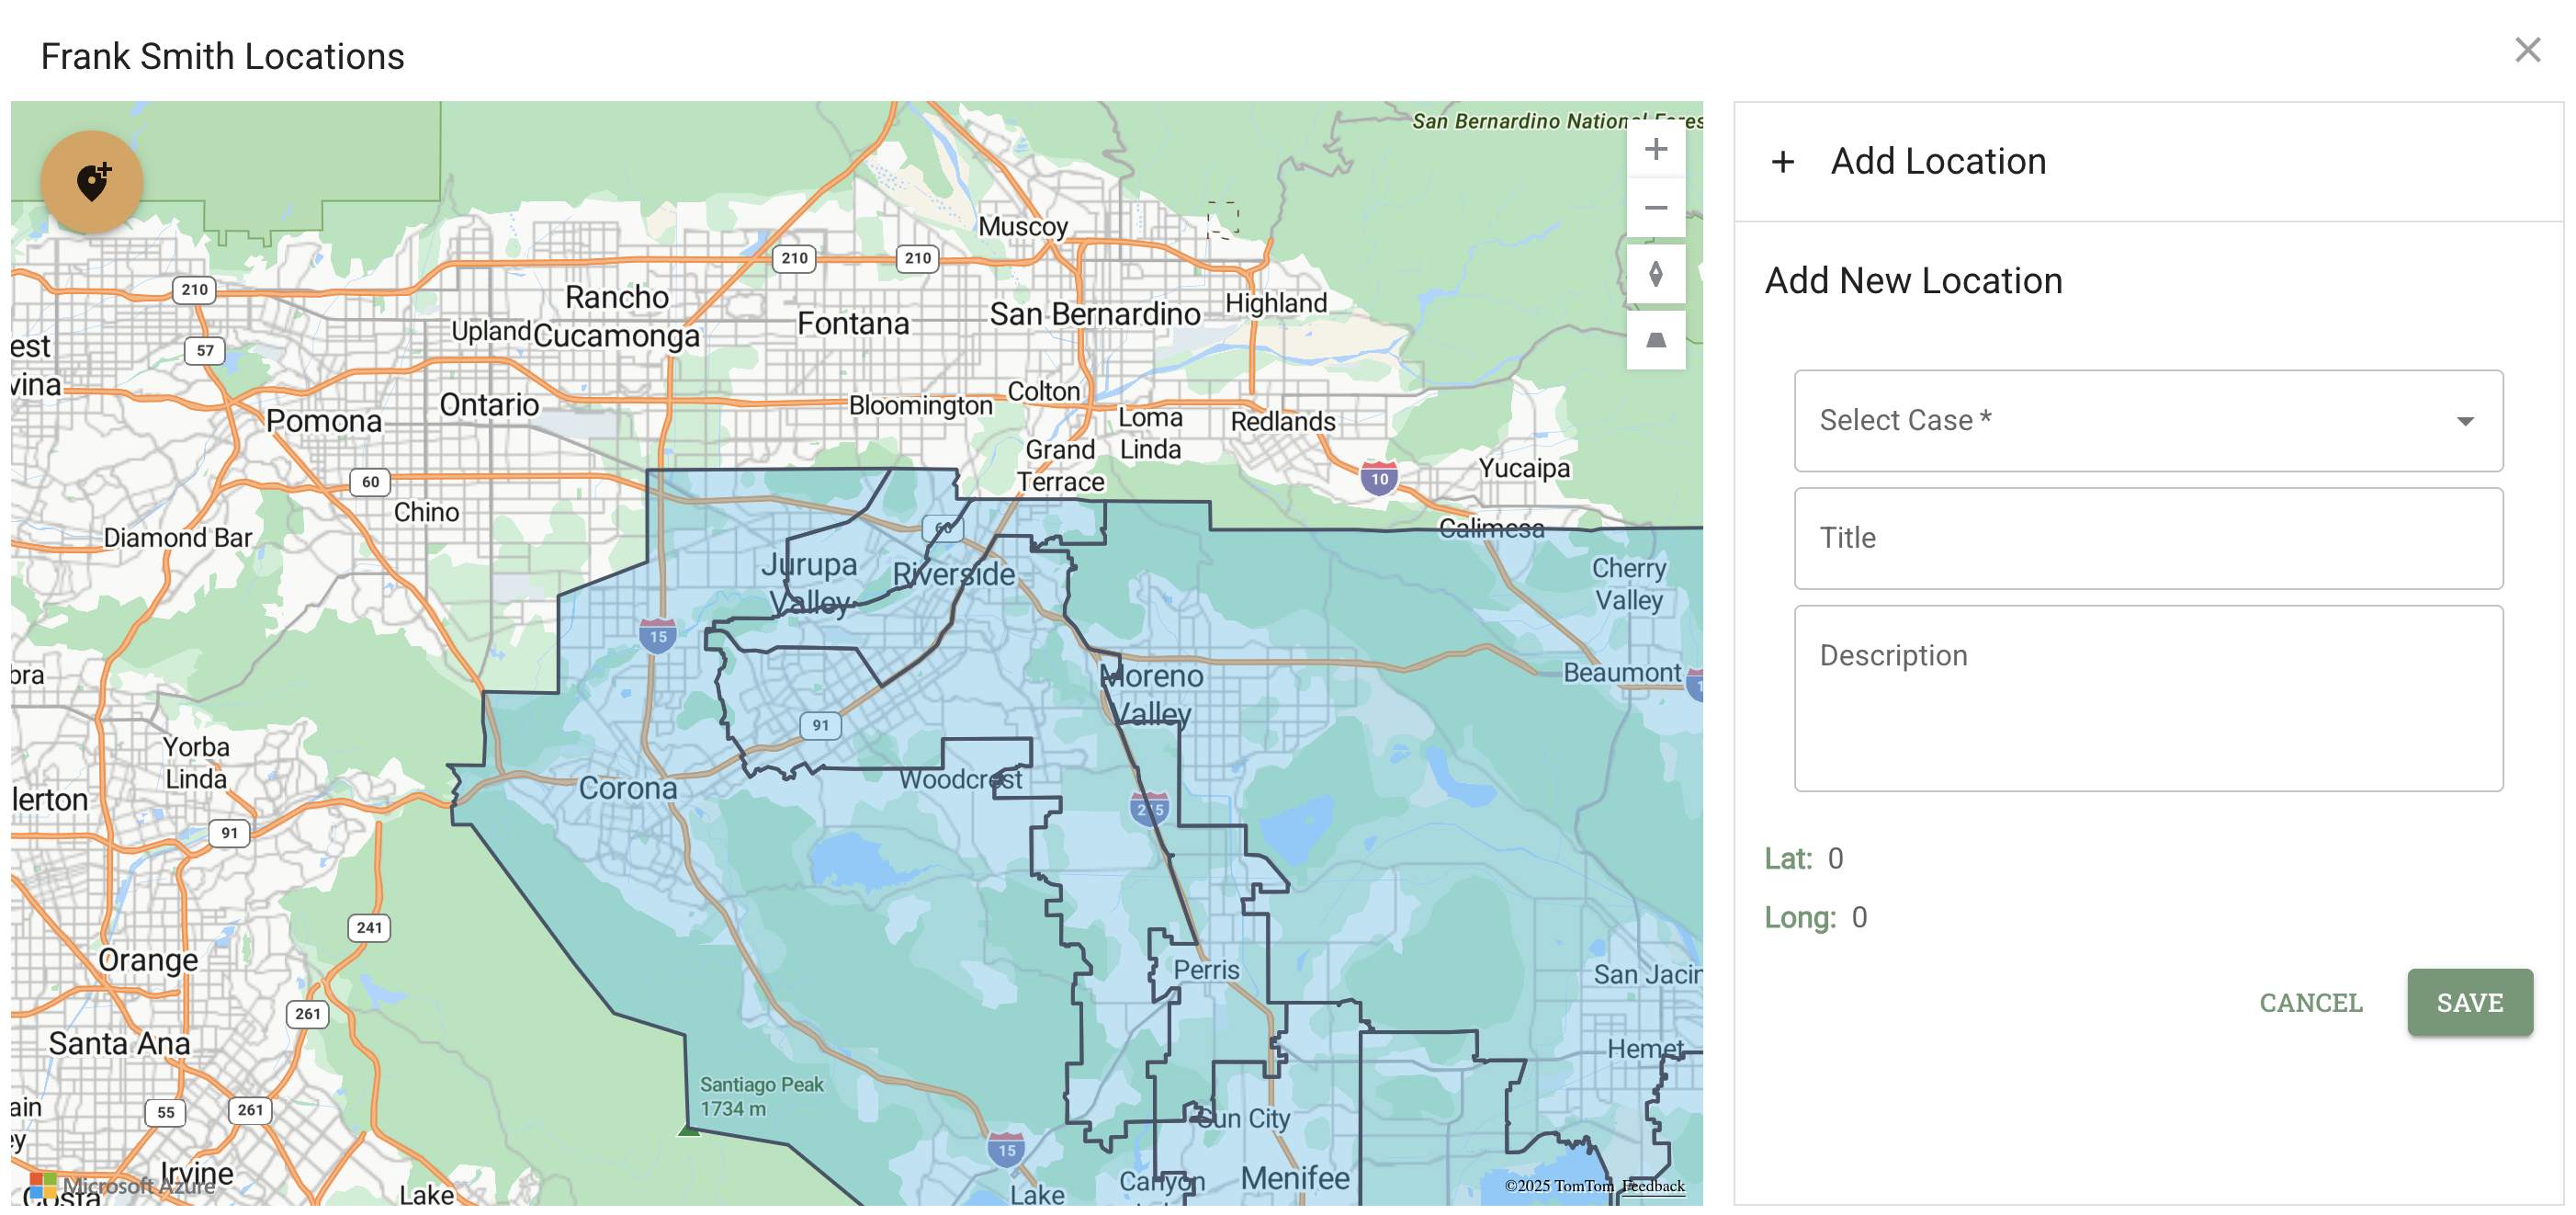
Action: Click the orange "Location+" icon in the top-left corner of the map
Visual changes:
- Location+ icon changes color (indicating active selection mode)
- Mouse cursor becomes a "+" crosshair when hovering over the map
- Right panel switches to a blank entry form with search box at top
💡 Important: You must activate Add Location Mode before you can search for locations or place pins on the map.
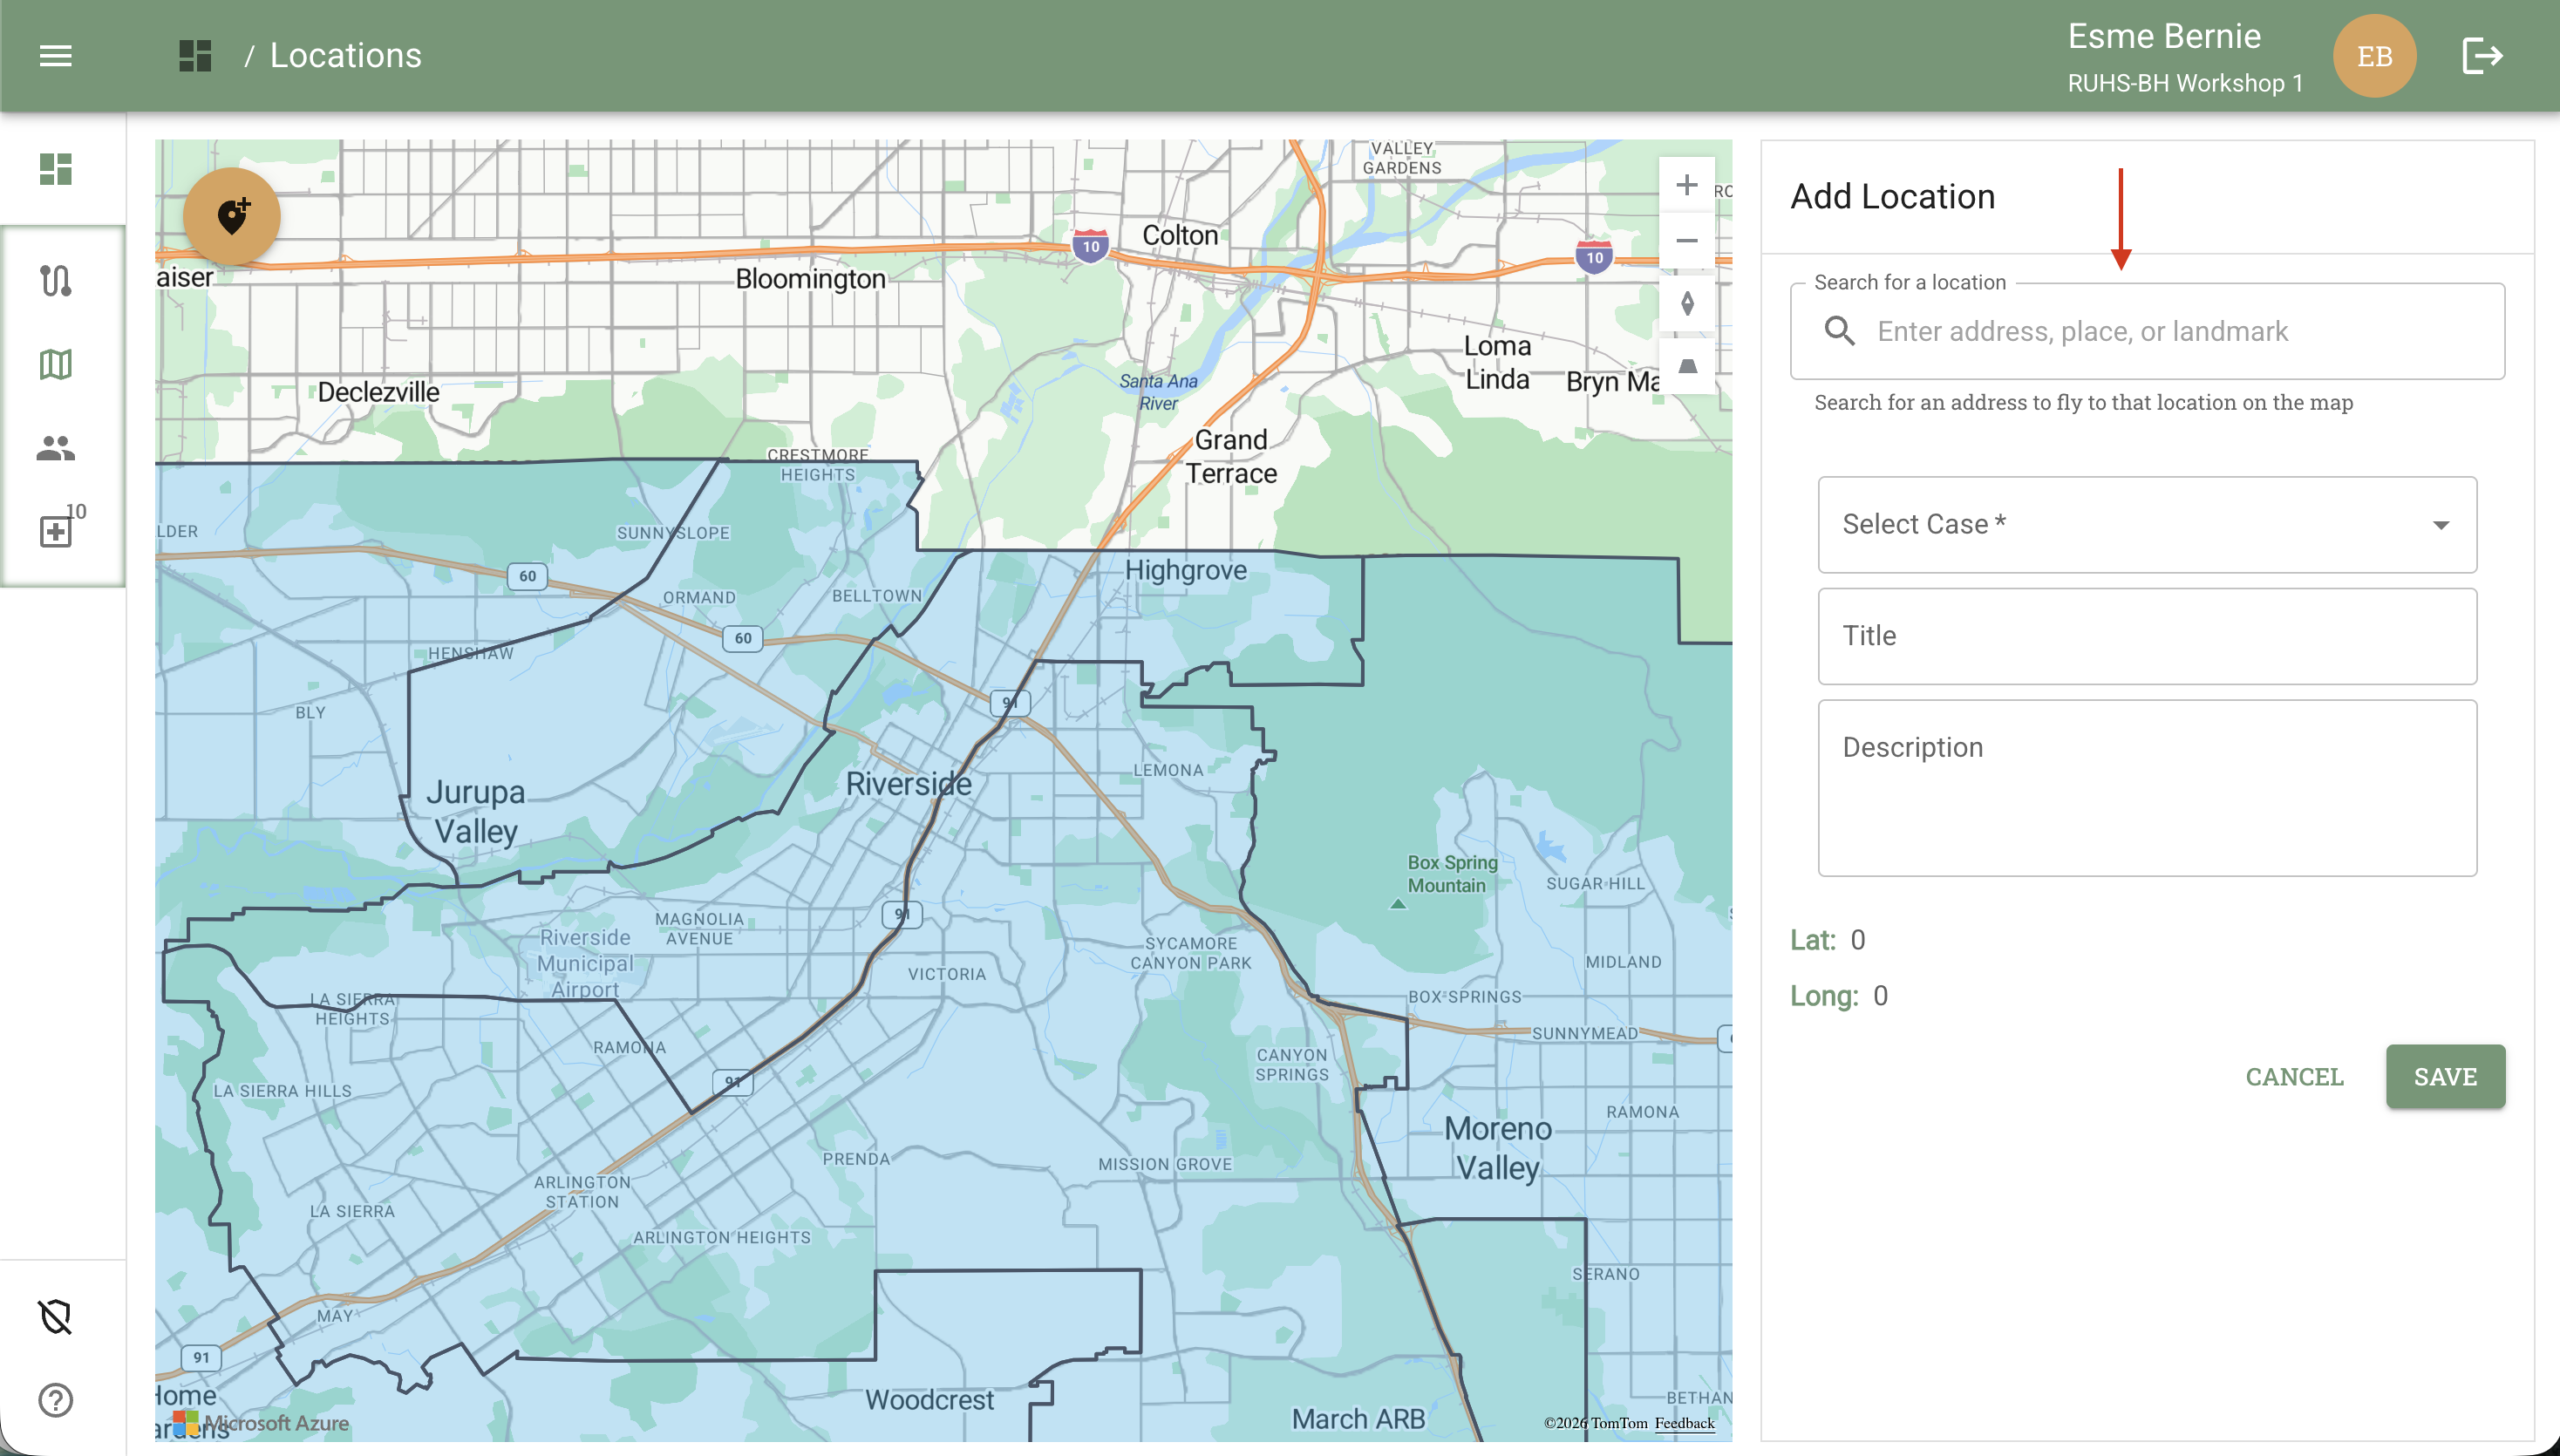
Step 2: Choose Your Method
Once Add Location Mode is activated, you have two ways to add a location:
Option A: Search for a Point of Interest or Address
Location: Under the "Map Locations" header at the top of the right panel, you'll see a search box
Search Input:
- Text box with placeholder: "Enter an address, place, or landmark"
- Begin typing to see autocomplete suggestions
- Results update as you type more characters
What you can search:
1. Addresses - Full or partial street addresses
- Example: "123 Main Street, San Francisco"
- Autocomplete suggests matching addresses
2. Points of Interest (POI) - Named locations like businesses or landmarks
- Example: "Safeway", "Memorial Park", "City Hall"
- Shows POIs within approximately 1 mile radius of current map view
Search behavior:
When you select a result from the dropdown:
- The map automatically "flies" (animates) to that location
- View centers on the selected address or POI
- A pin appears at the selected location
- Latitude and Longitude auto-populate in the form fields on the right
- Continue to Step 3 to fill out location details
💡 Tip: If you don't see the POI you're looking for, try scrolling/zooming out on the map to expand your viewbox. Search results may be limited to a range of what's visible in your current map area.
Use cases:
- Quickly navigate to a known address
- Find nearby grocery stores or pharmacies
- Locate community resources or service providers
- Save a specific address as a client location
Option B: Manually Place a Pin on the Map
Action: Click anywhere on the map where you want to drop the location pin
Example use cases:
- Last known address
- Frequent hangout location (e.g., "Wally's Market")
- Important landmark for client safety planning
- Field visit meeting point
What happens:
- A pin appears at the clicked location
- Latitude and Longitude auto-populate in the form fields on the right
- You can still scroll to zoom in/out before finalizing
💡 Tip: If you place the pin in the wrong spot, you can click elsewhere to move it or click "Cancel" before saving.
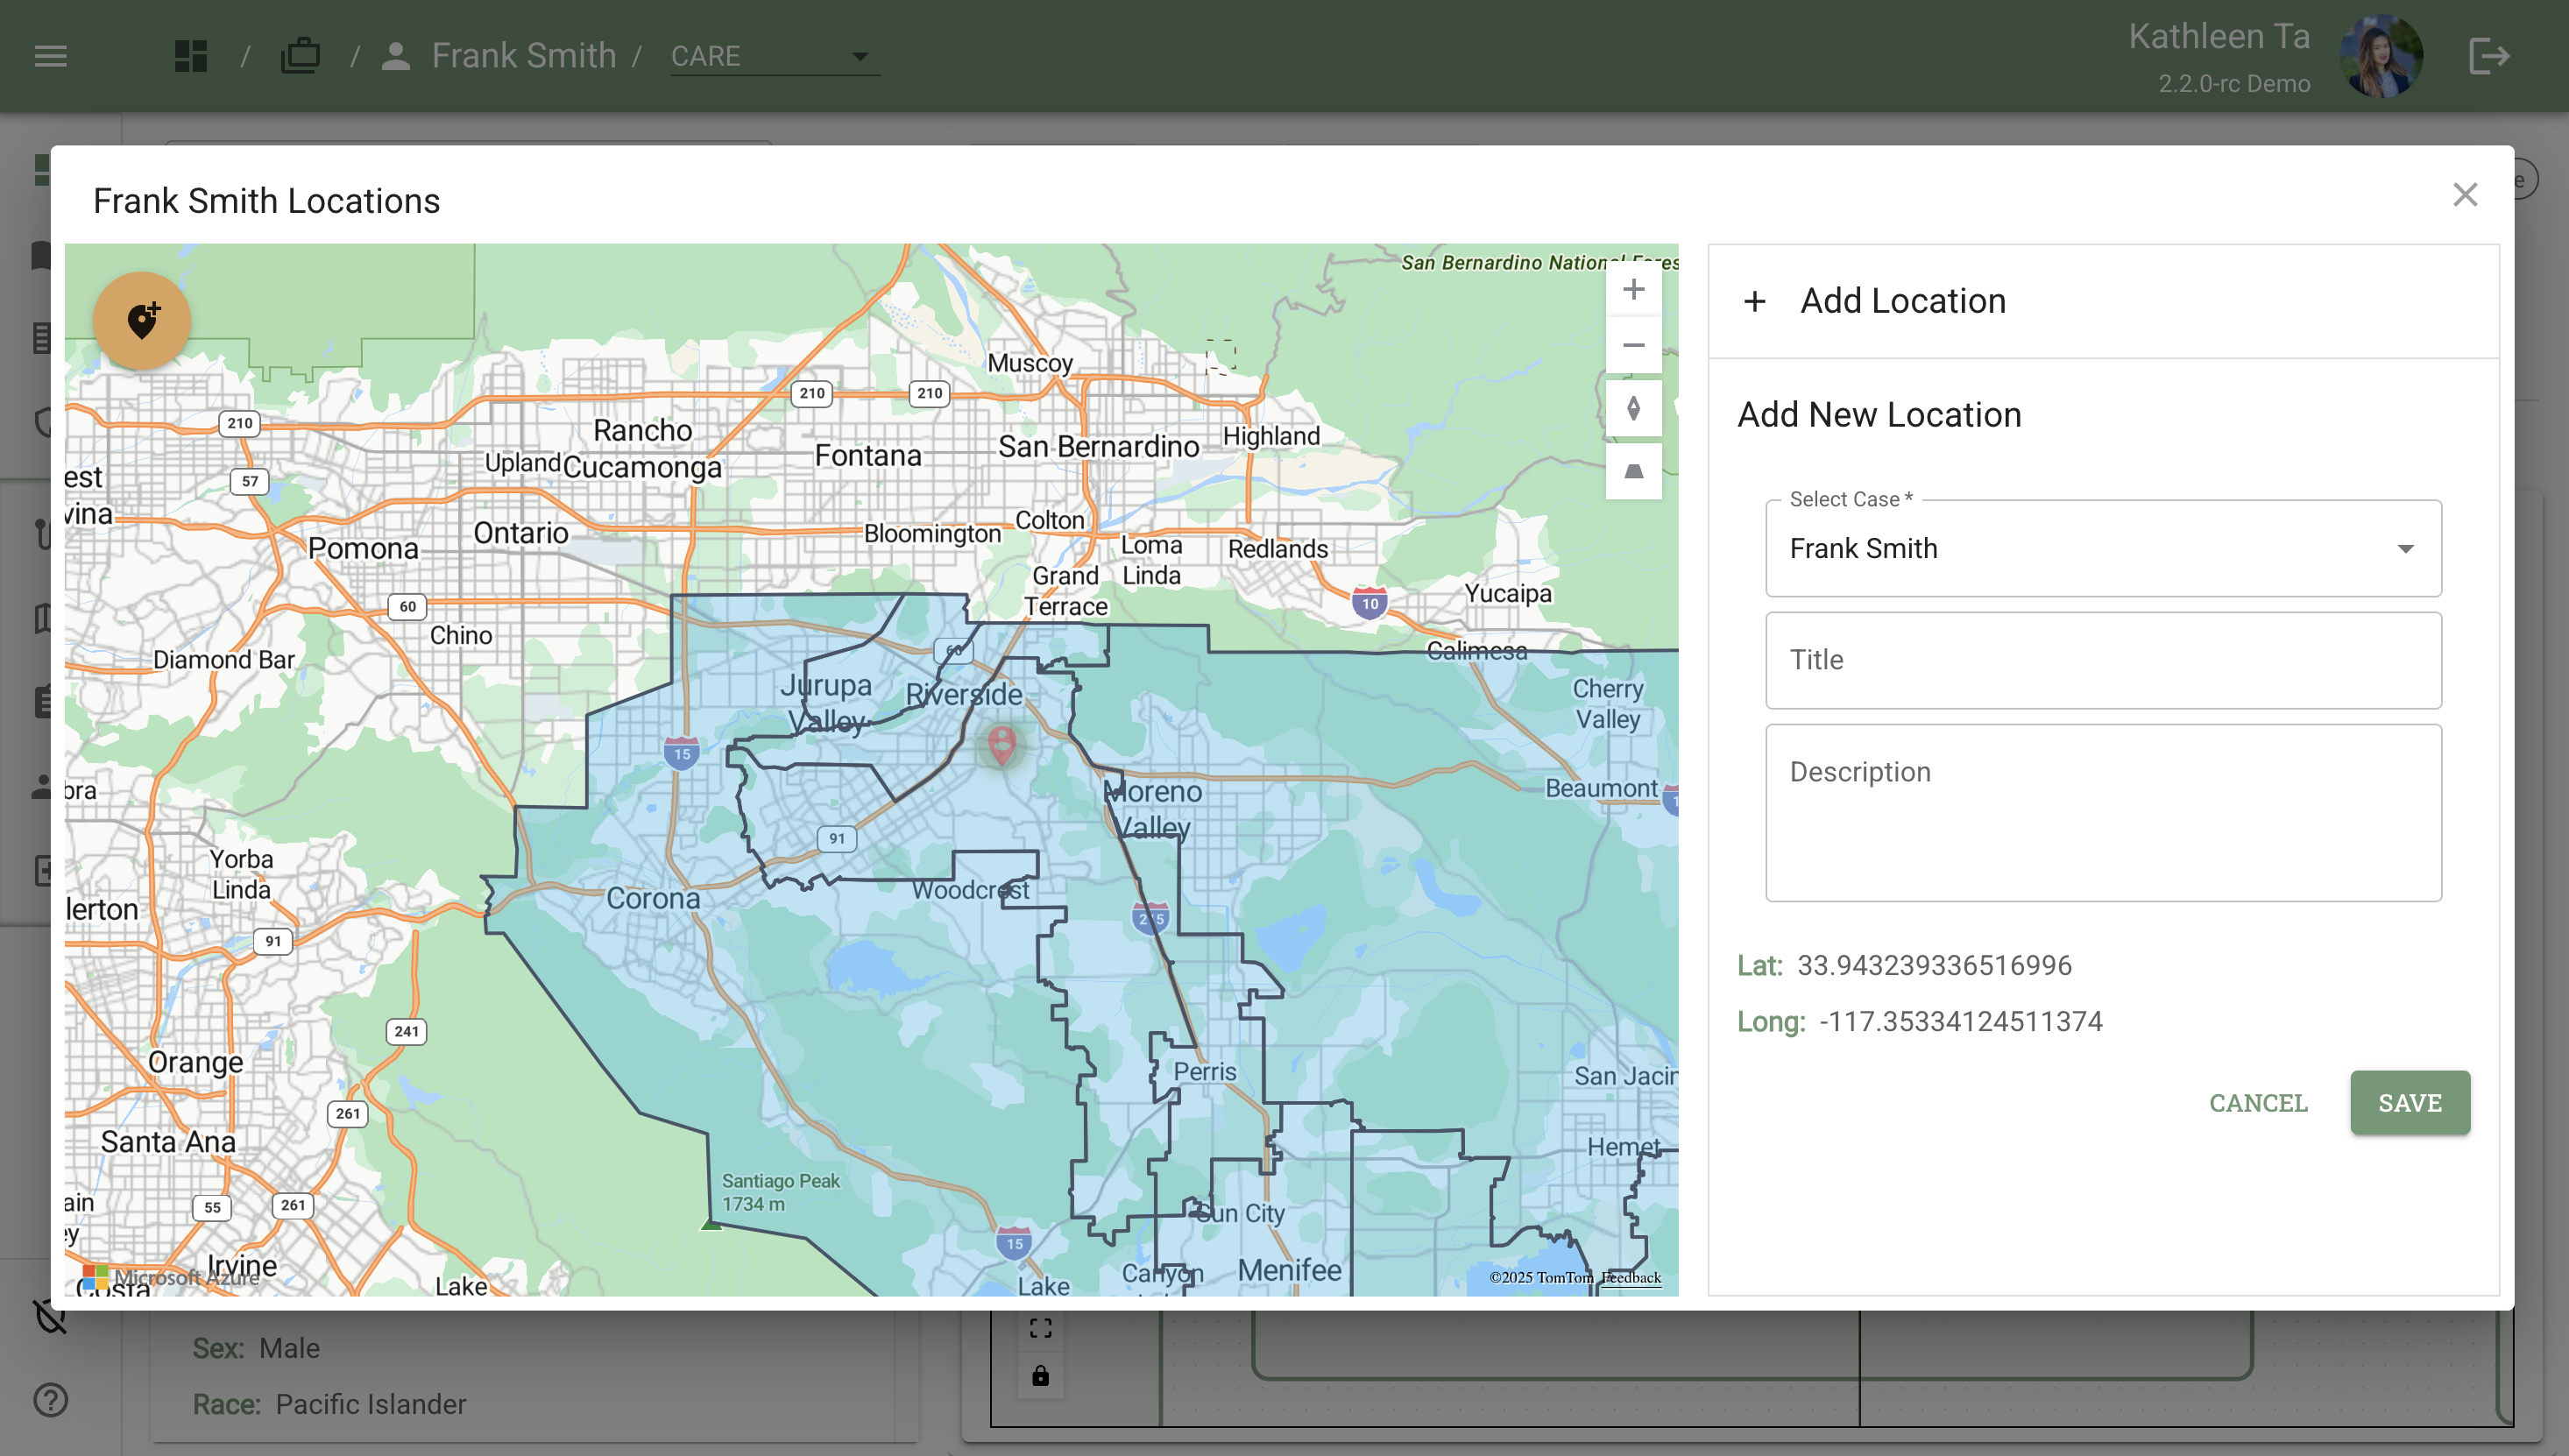
Step 3: Fill Out Location Details
The form on the right panel now shows several fields:
Select Case Dropdown
Default behavior:
- When accessed from Case Page: Auto-filled with the current client's name (e.g., "Frank Smith")
- When accessed from Navigation Bar: Defaults to a client but can be changed to any case in your caseload
Why you can change it: You may want to add a location for a different client than the one currently displayed, or realize this location is relevant to a different client
Example scenario: You're viewing all locations from the navigation bar and want to add a pin for Jane Doe, or you're on Frank Smith's case page but remember this location is actually where Jane Doe frequents
Latitude and Longitude Fields
Auto-populated when you place the pin
Read-only after pin placement (unless you move the pin)
Title Field
Purpose: Short name for the location
Examples:
- "Wally's Market"
- "Last Known Address"
- "Sister's Apartment"
- "Bridge Underpass - South Side"
Description Field (Optional but Recommended)
Purpose: Free-text notes helpful for team members and fieldwork planning
Examples:
- "Last seen here on 11/15/2025. Is a frequent customer for soda pop on weekday afternoons."
- "Client stays here when evicted. Sister is cooperative with outreach."
- "Known encampment location. Approach with caution, bring partner."
- "Former employer - do not approach, restraining order active."
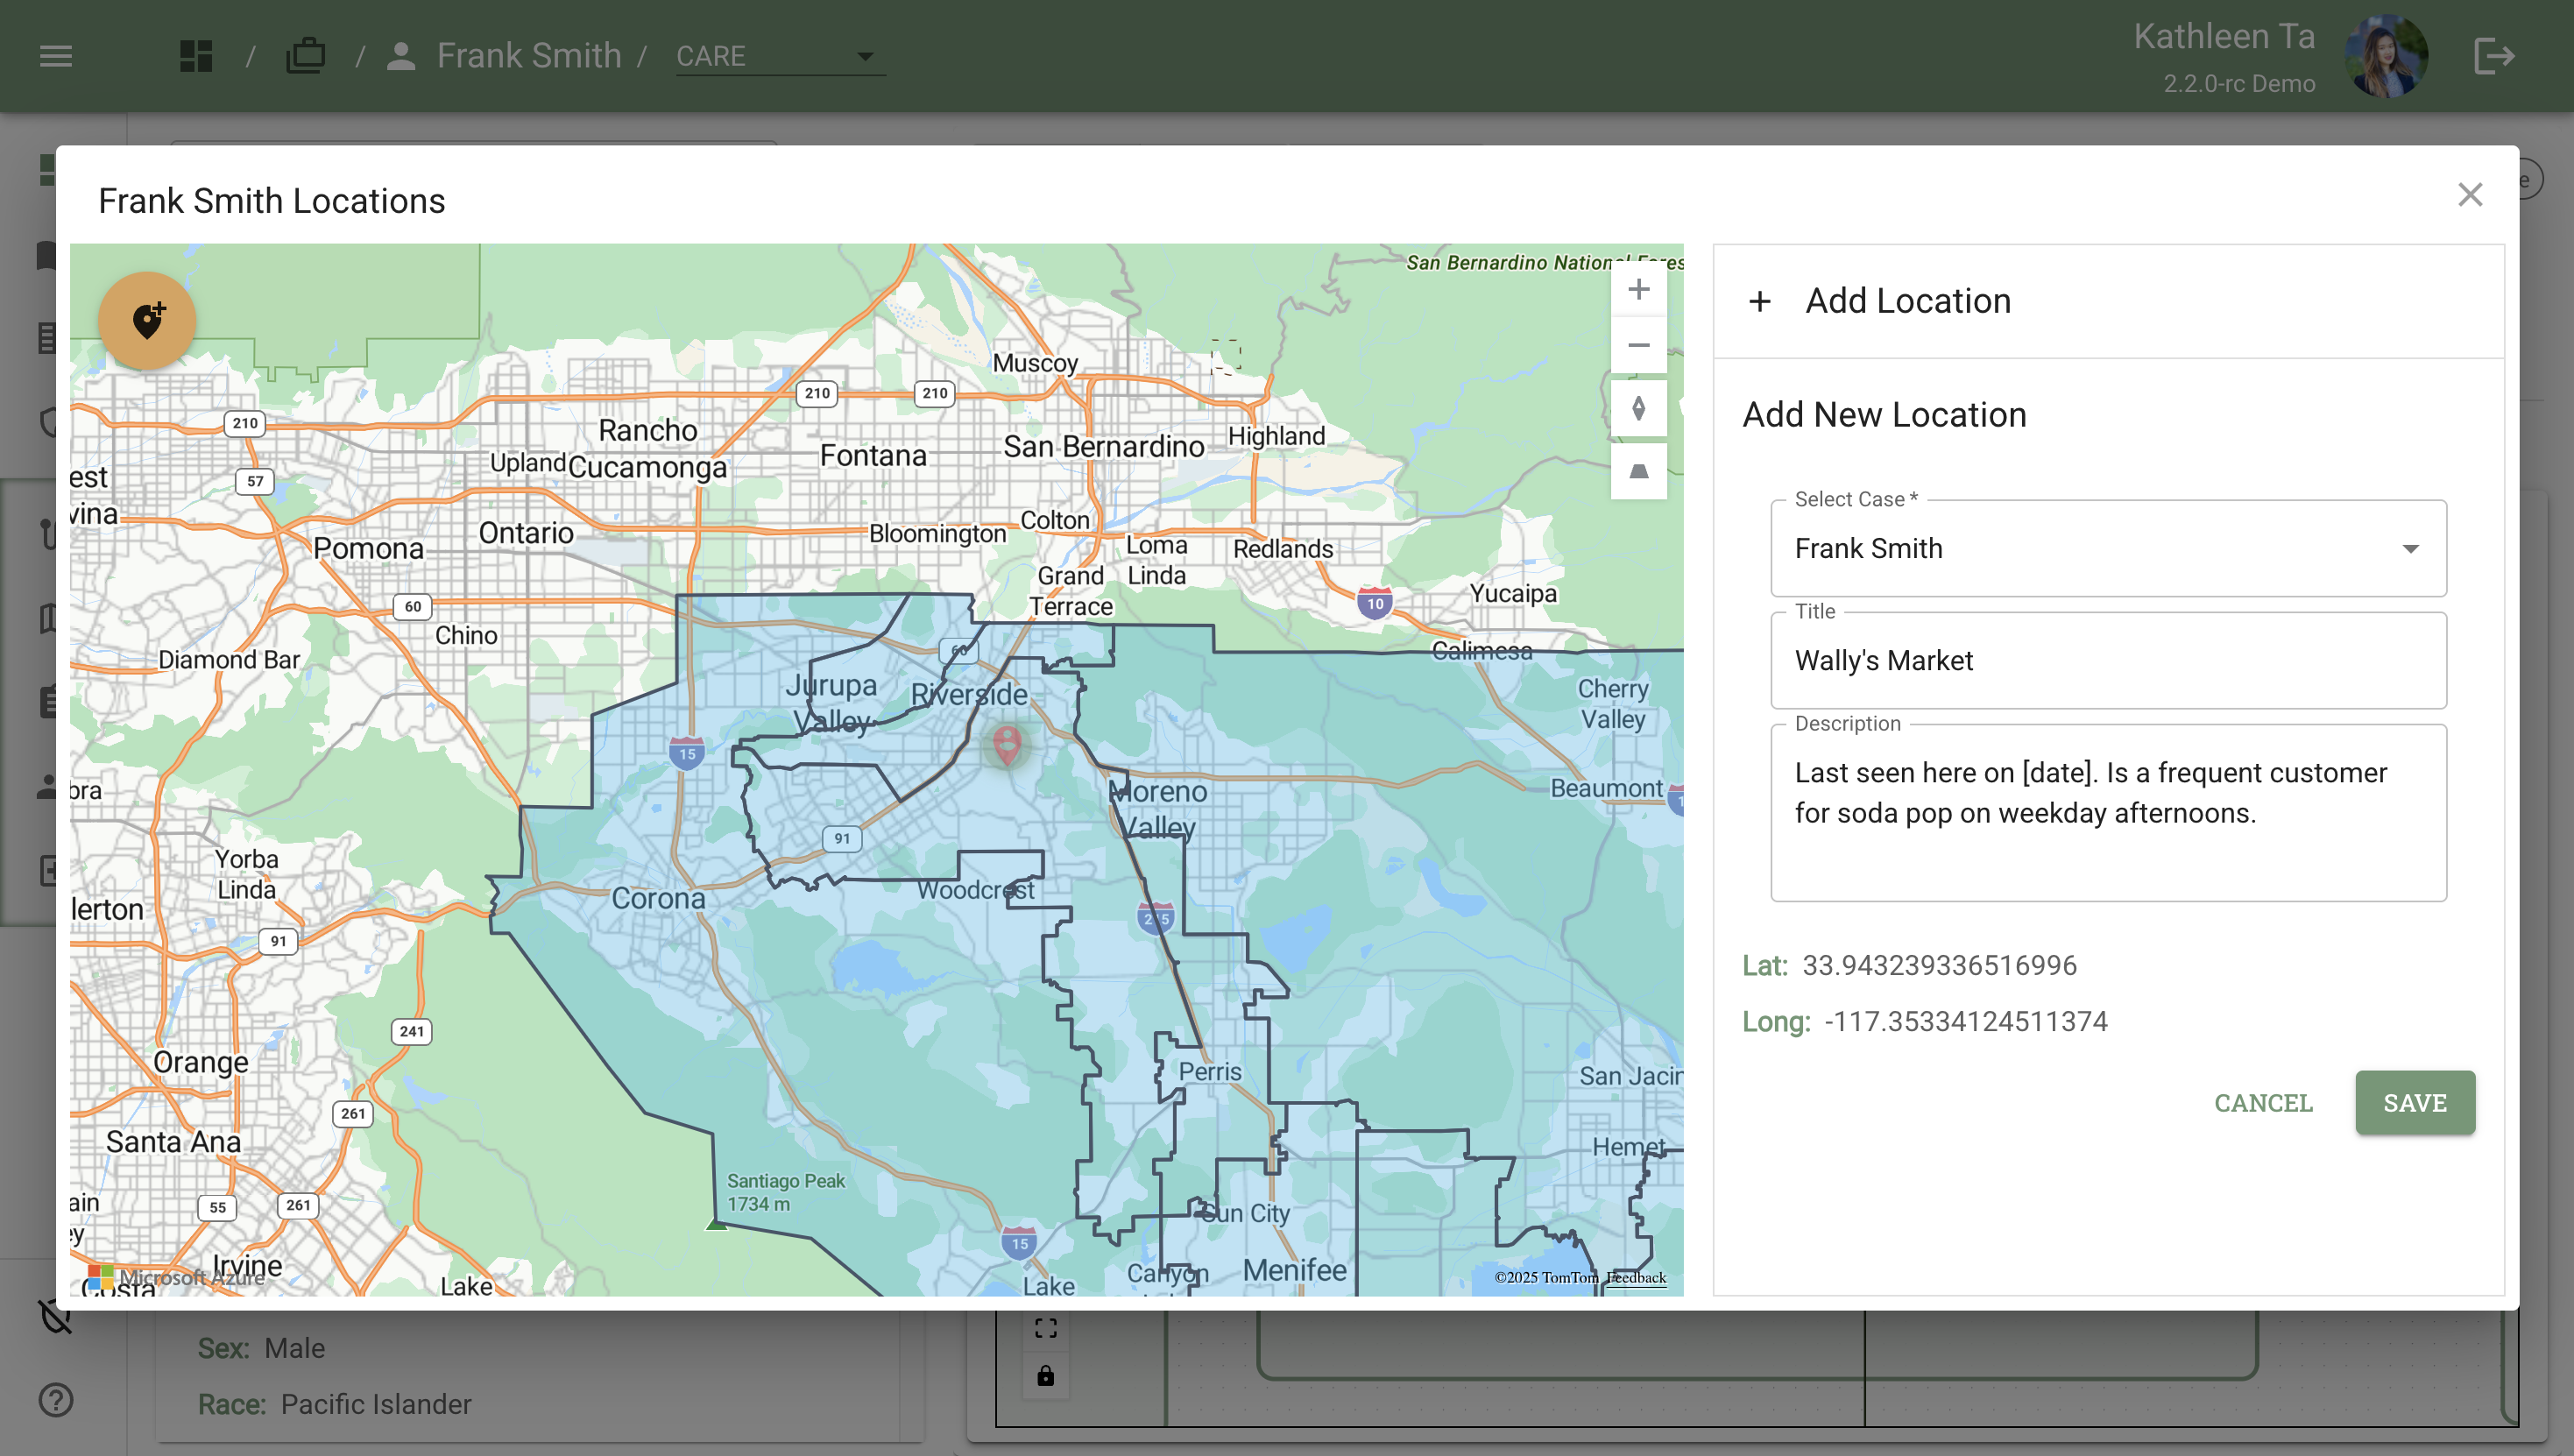
Step 4: Save the Location
Action: Click the green "Save" button at the bottom of the form
What happens:
- The location is saved to the selected client's case
- If accessed from Case Page: The Locations overlay closes and you return to the Case Page; a checkmark appears next to the Locations button: "Locations ✓"
- If accessed from Navigation Bar: The location is saved and the pin appears on the map; the accordion panel updates to show the new location
- The pin now appears on the map whenever you view Locations (from either access point)
💡 Tip: The checkmark on the Case Page Locations button persists as long as the client has at least one saved location pin.
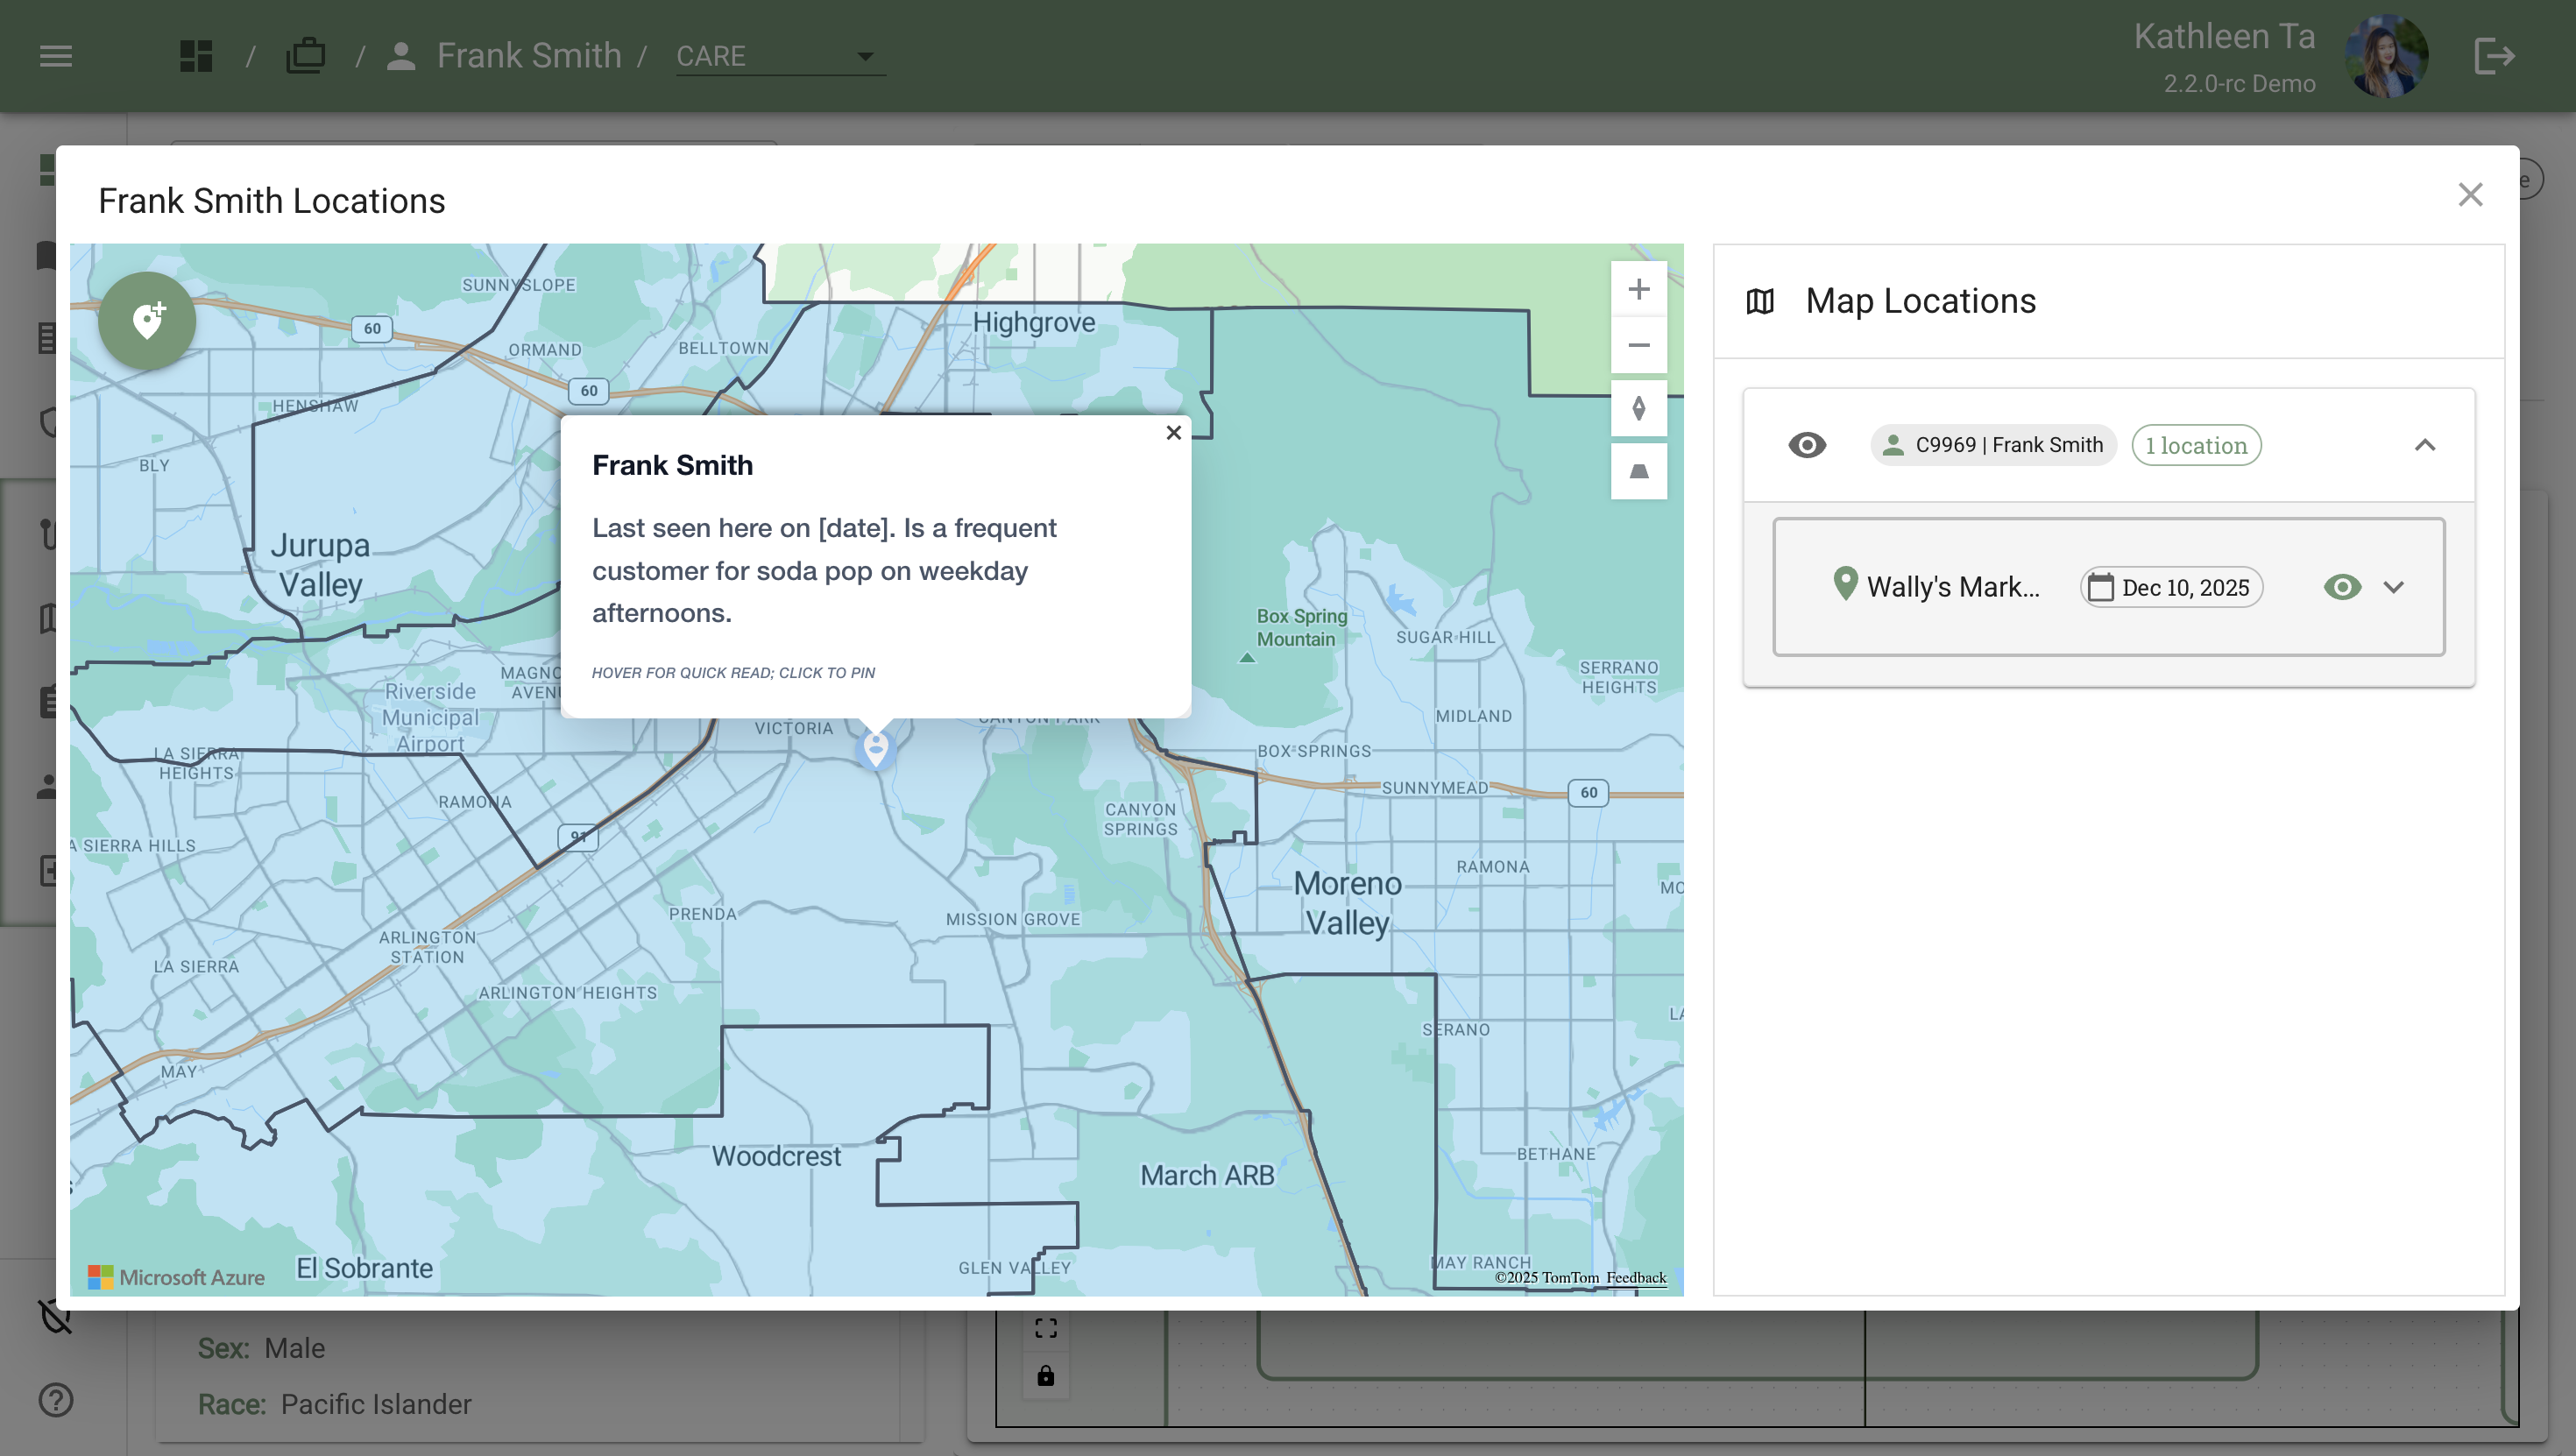
Viewing and Managing Saved Locations
Re-Opening the Locations Pop-up
Click the "Locations ✓" button again to view saved pins and add more locations.
What you see now: [Screenshot 5]
- Map: Automatically zooms to show the saved pin location
- Right panel (accordion): Lists the saved location but is collapsed by default
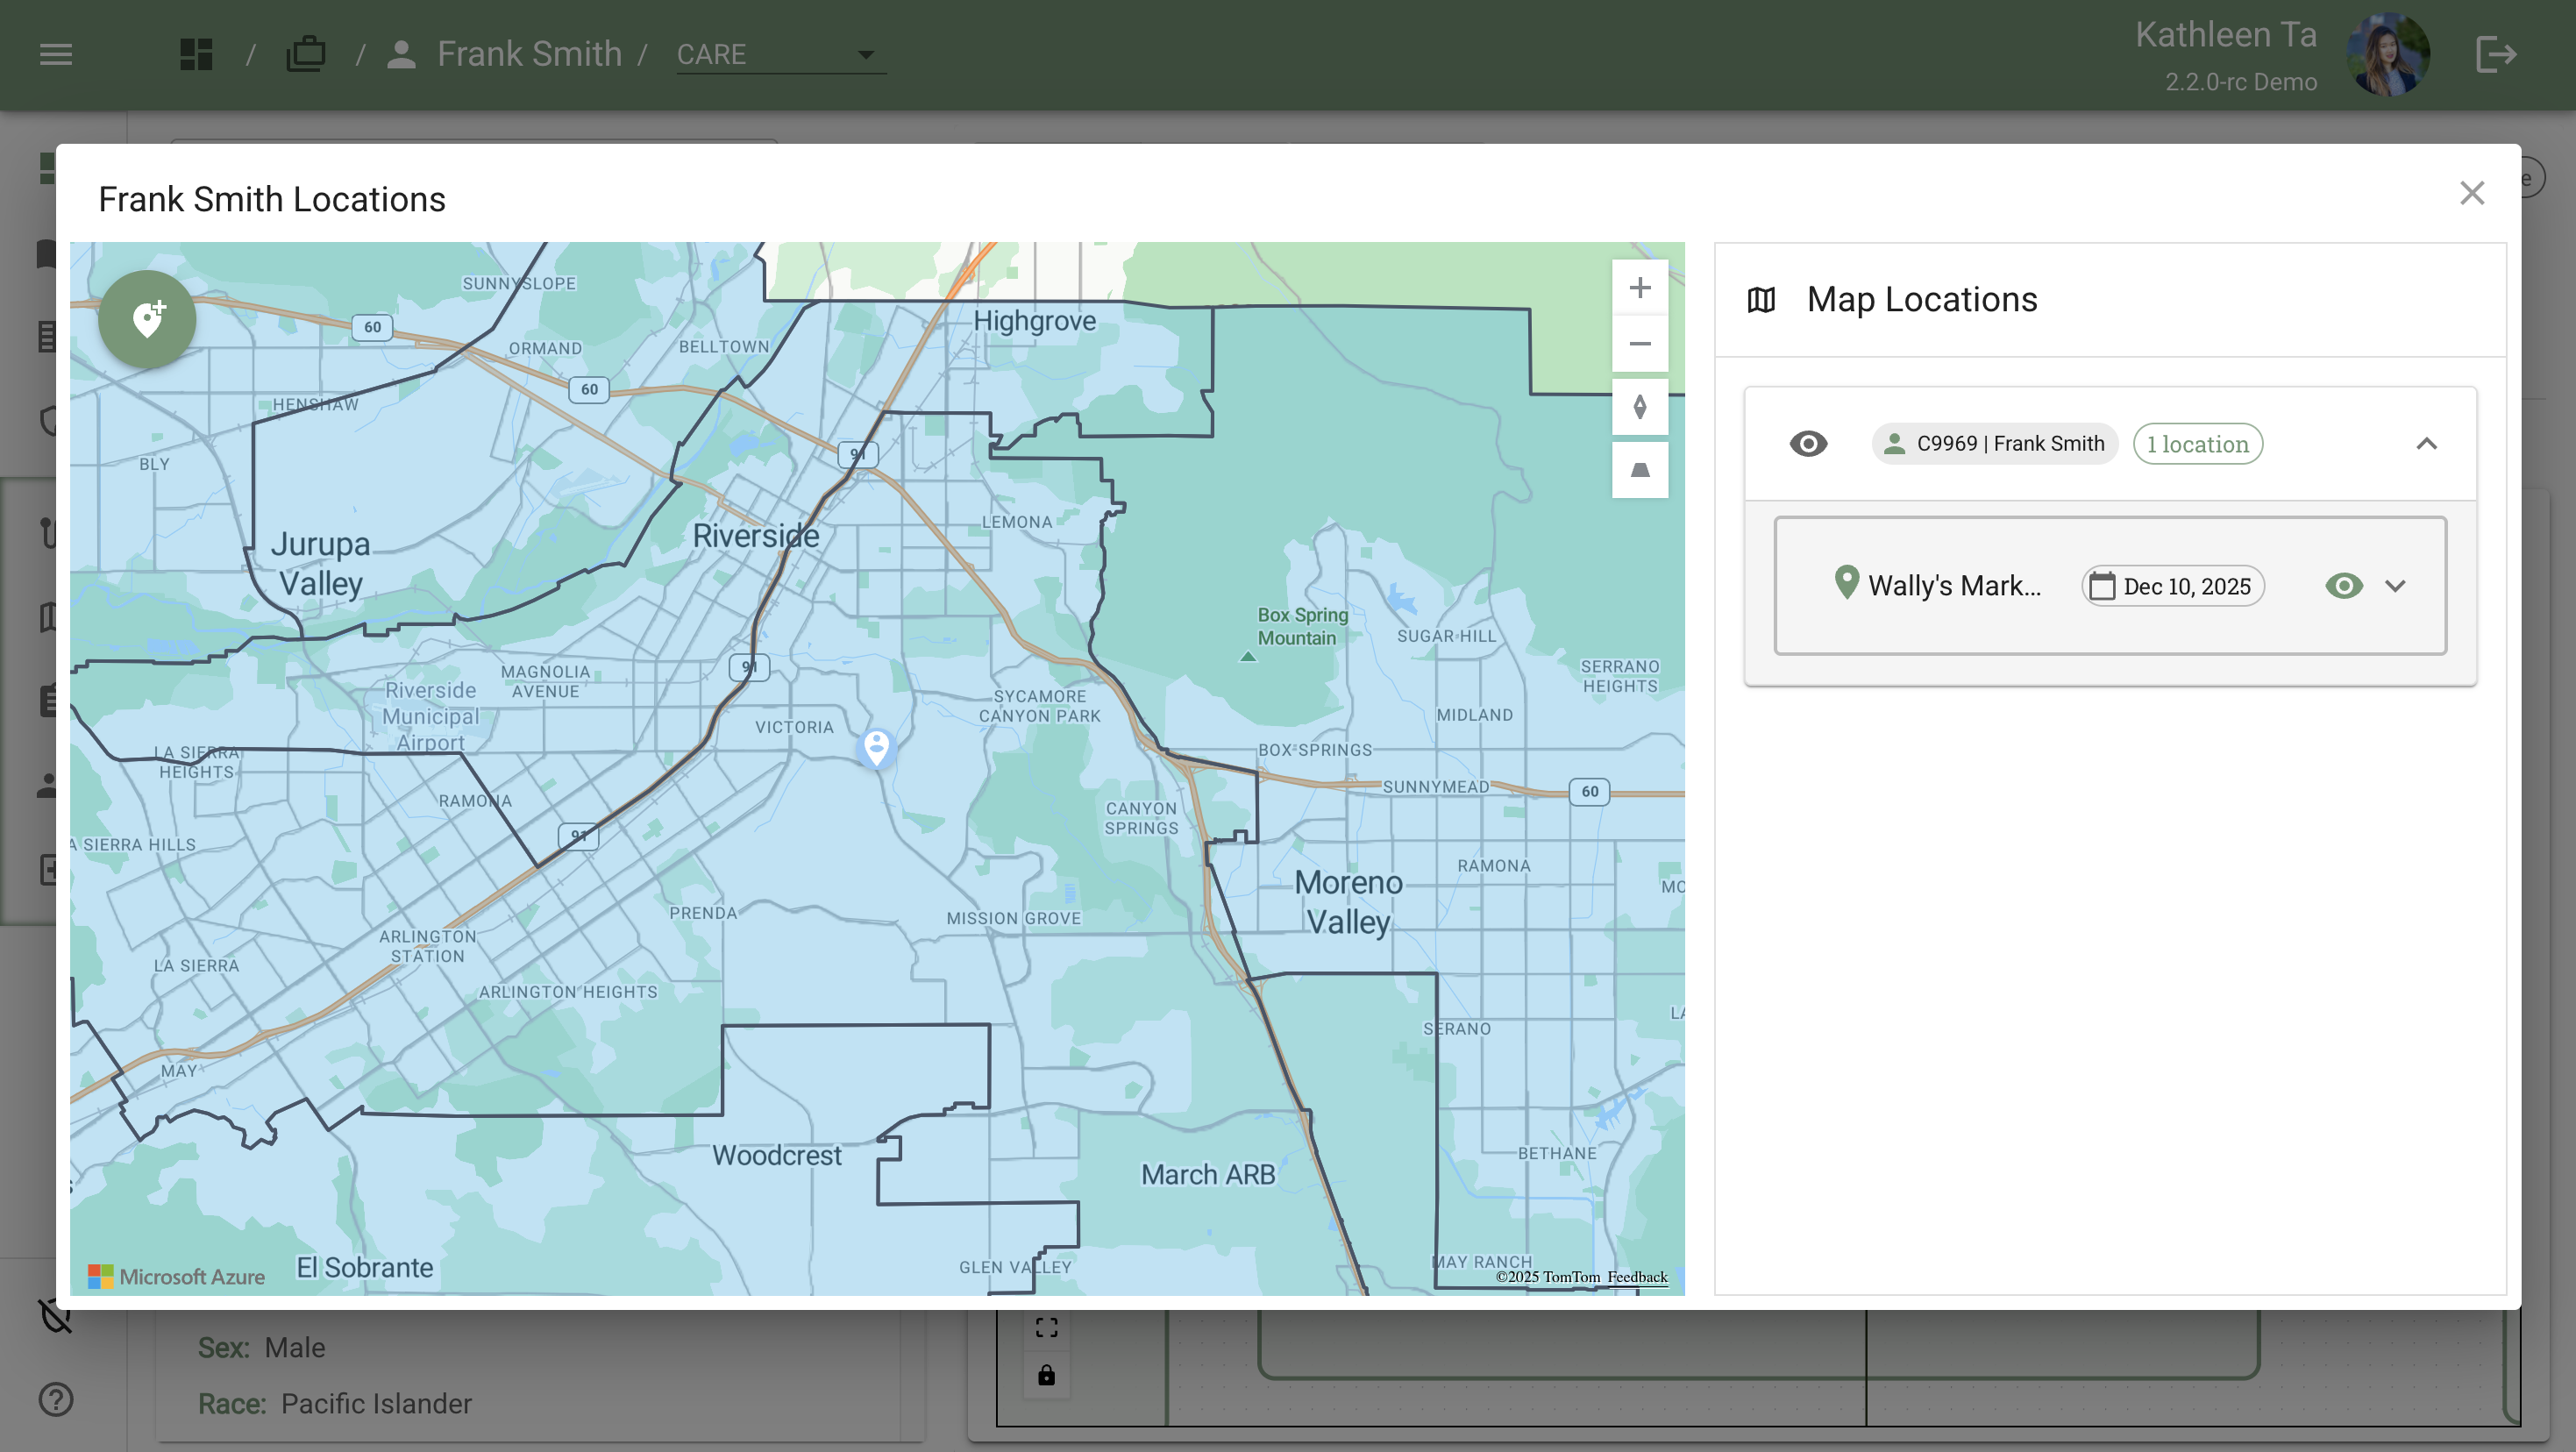
Expanding the Accordion
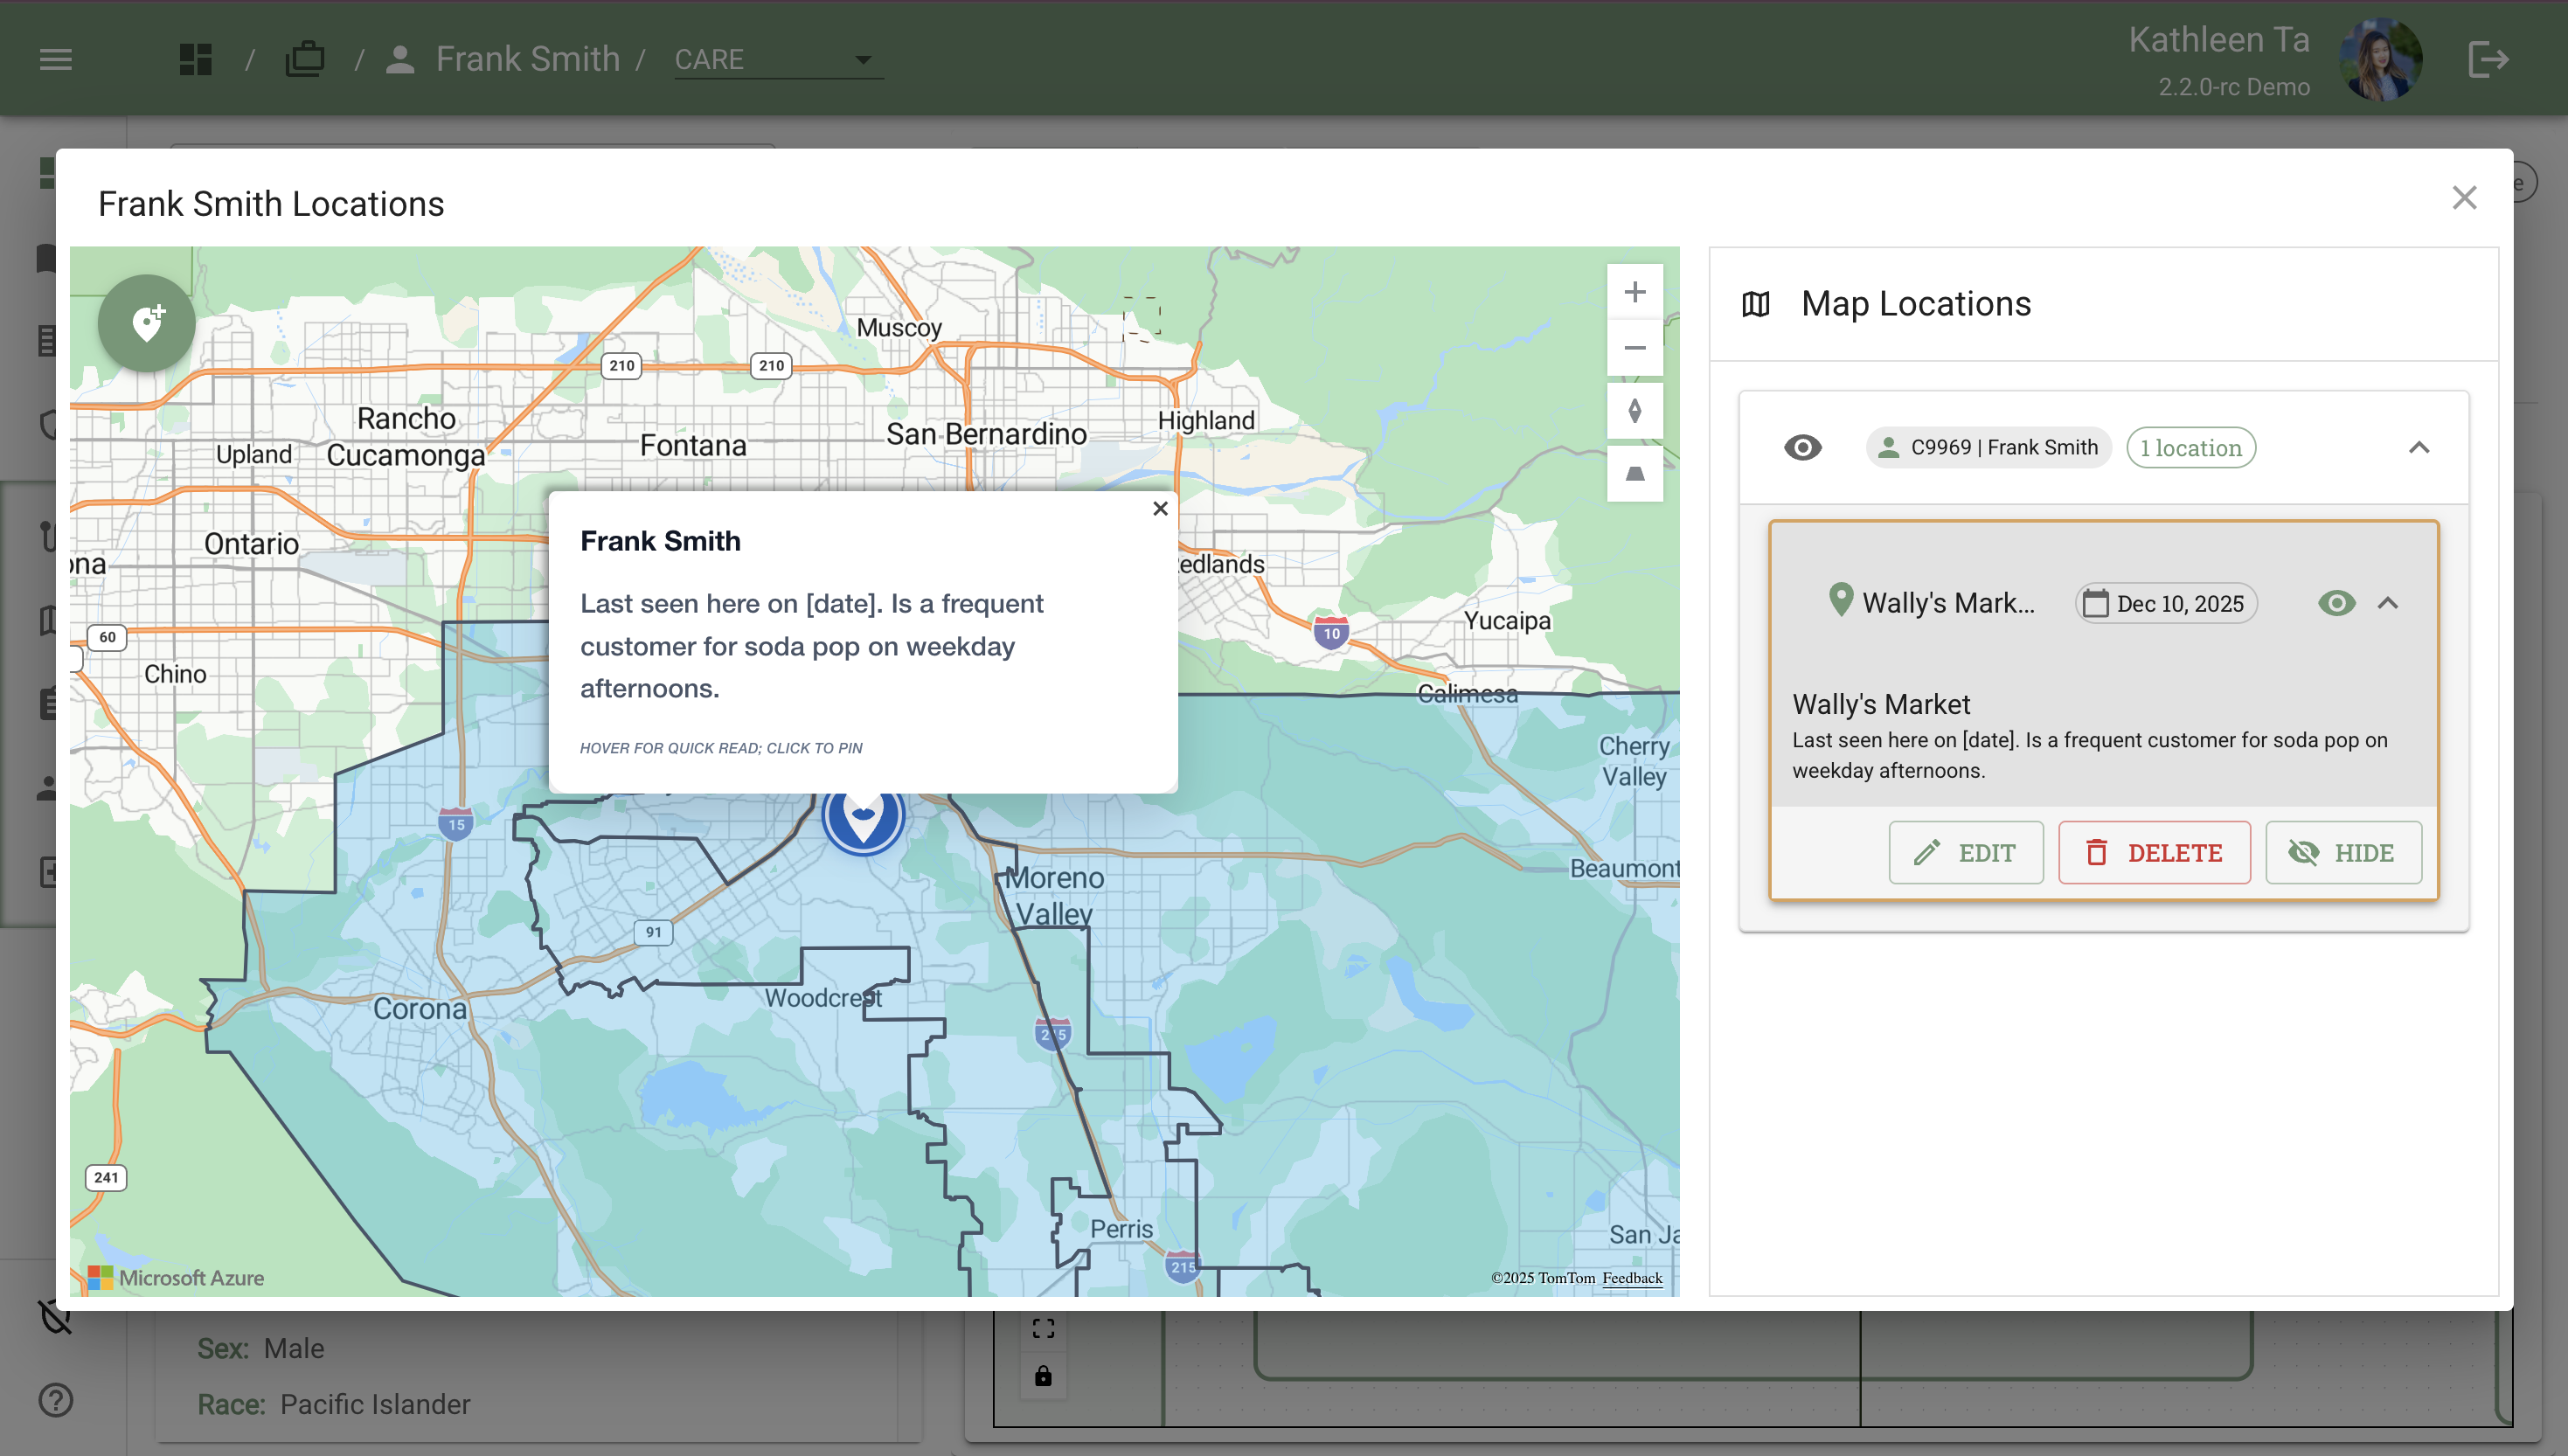
Action: Click anywhere on the collapsed accordion entry, including:
- The client name
- The location title
- The upside-down caret (^) icon
Expanded view shows:
- Location name/title
- Date added
- Full description text
- Action buttons:
- Edit - Modify title, description, or pin position
- Delete - Remove the location pin permanently
- Eye icon (Hide) - Temporarily hide this specific pin from the map
Interacting with Pins on the Map
Hovering Over a Pin
Action: Move your mouse cursor over any pin on the map (without clicking)
Result: A tooltip text box appears showing the Description for that pin
Use case: Quick review of location notes without opening the accordion
Clicking on a Pin
Action: Click directly on a location pin
Result:
- The corresponding accordion entry automatically expands in the right panel
- The pin is highlighted with a blue outline for easy visibility
- Full location information becomes visible (title, date, description, action buttons)
Use case: Quickly jump to full details for a specific pin

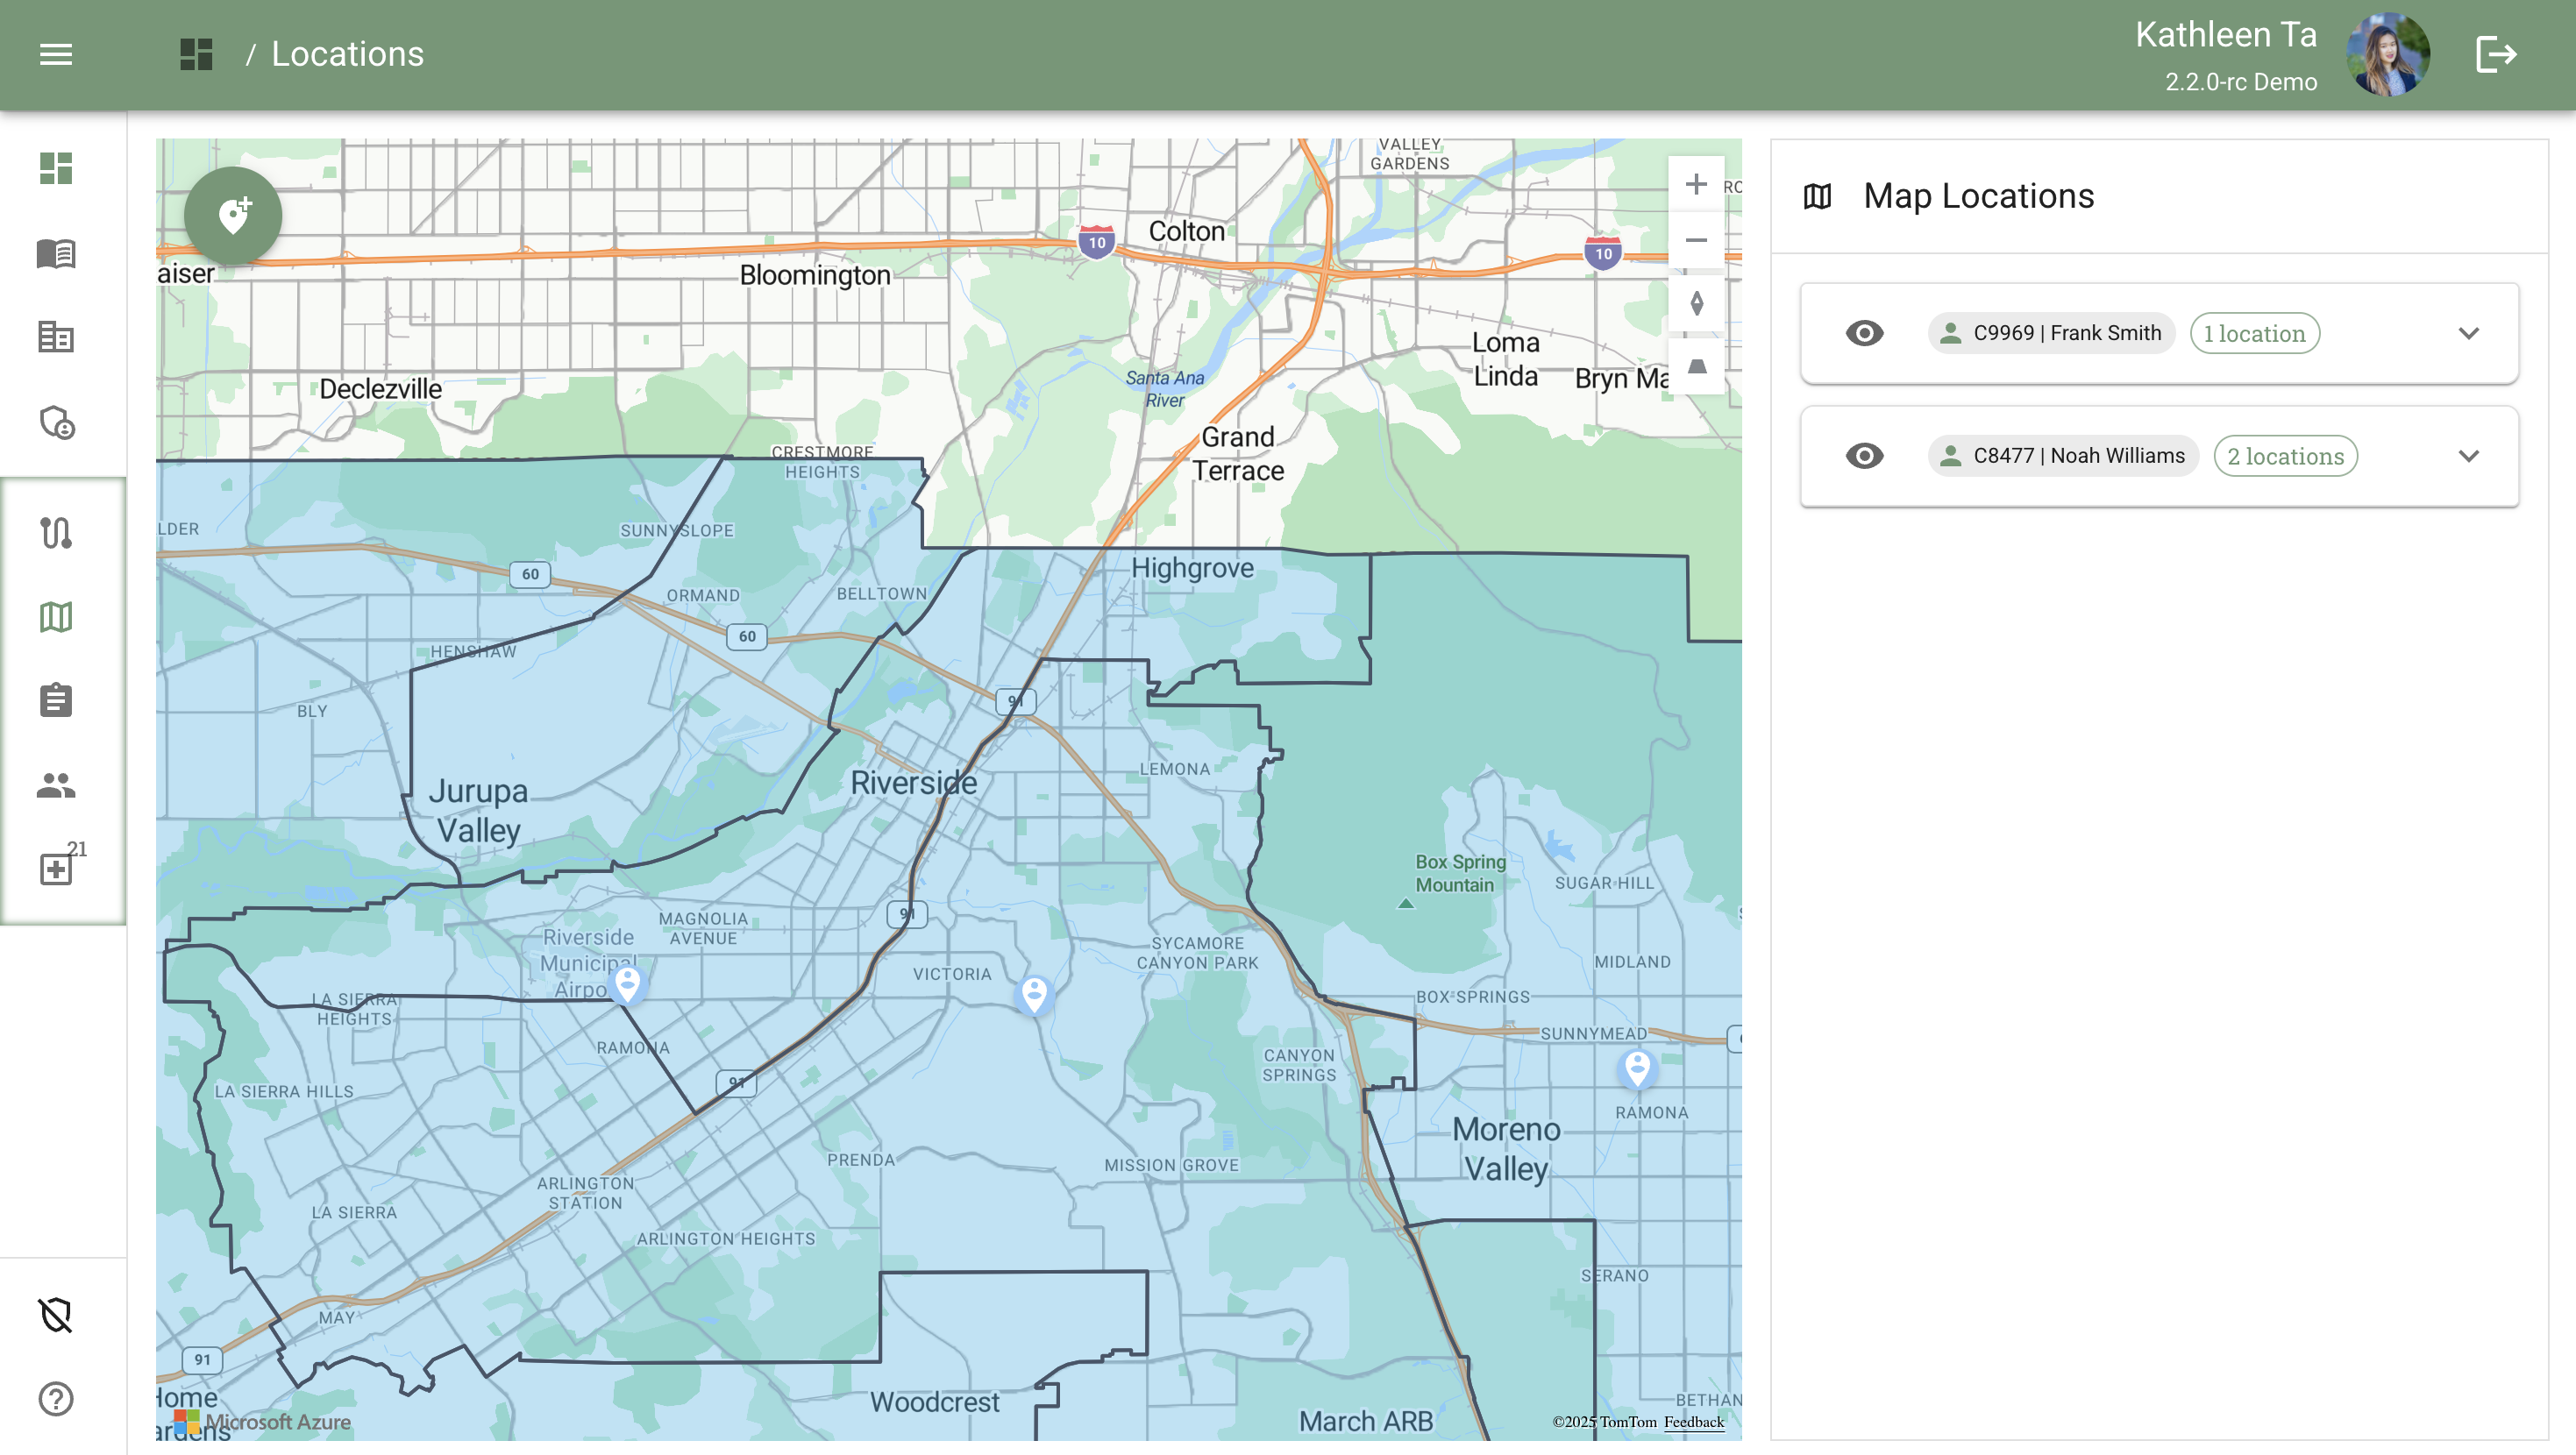
Organizing Fieldwork: Multiple Clients
How Multiple Clients Appear
When accessed from the Navigation Bar (Locations Page):
- All clients in your caseload with saved locations appear in the right-hand accordion panel
- Each client has their own section grouped by case ID
- Each client can have multiple location pins listed under their name
- Accordion sections can be expanded/collapsed independently
- Map shows all pins for all clients (color-coded or styled for easy identification)
When accessed from a Case Page:
- Only the current client's locations appear in the right-hand accordion panel
- Map is filtered to show only that client's pins
- Cleaner view focused on case-specific context
Example structure (Navigation Bar view):
📍 Frank Smith (C9969) - 3 locations
  - Wally's Market
  - Sister's Apartment
  - Last Known Address

📍 Jane Doe (C9970) - 2 locations
  - Bridge Underpass
  - Day Shelter
Using Visibility Toggles for Organization
The Locations feature includes two levels of visibility control:
Client-Level Toggle (Hide All Locations)
Location: Eye icon next to the client name in the accordion
Action: Click to toggle visibility for all pins associated with that client
States:
- Eye open = All client's pins visible on map
- Eye closed/crossed out = All client's pins hidden from map
Use case: Hide entire clients who aren't relevant to today's fieldwork planning
Pin-Level Toggle (Hide Single Location)
Location: Eye icon within each individual location's accordion entry
Action: Click to toggle visibility for that specific pin only
States:
- Eye open = Pin visible on map
- Eye closed/crossed out = Pin hidden from map
Use case: Hide specific locations that aren't relevant for today's route planning while keeping other pins for that client visible
Use Cases and Best Practices
Outreach and Field Coordination
Use location pins to:
- Map frequent client locations for efficient field visits
- Plan daily routes by viewing all relevant pins at once
- Share important location context with team members
- Document last-seen locations for safety checks
Best practices:
- Add detailed descriptions so teammates understand location context
- Update descriptions when client patterns change
- Use visibility toggles to focus on today's priority clients
- Check pins before scheduling field visits to plan efficient routes
Safety Planning
Use location pins to:
- Document known danger areas or hostile locations
- Mark safe meeting spots for client interactions
- Note locations with supportive family members or resources
- Identify encampment locations for coordinated outreach
Best practices:
- Include safety notes in descriptions (e.g., "Approach with caution")
- Mark restraining order locations with clear warnings
- Update pins when safety situations change
- Share critical safety information in location descriptions
Documentation and Team Collaboration
Use location pins to:
- Maintain institutional knowledge about client locations
- Share location intelligence across team members
- Document field visit history with dates and outcomes
- Track changes in client location patterns over time
Best practices:
- Include dates in descriptions (e.g., "Last confirmed 11/15/2025")
- Note when information becomes outdated
- Delete or update pins when clients move permanently
- Use clear, professional language in descriptions
Tips and Tricks
Efficient Pin Management:
- Use Edit to update descriptions as situations change (no need to delete and recreate)
- Use Hide instead of Delete if you want to temporarily declutter the map
- Hidden pins remain in the accordion—you can always unhide them later
Fieldwork Planning:
- Before field days, hide clients you're not visiting to reduce map clutter
- Zoom in on your target area and review visible pins for route planning
- Use the description tooltips (hover) for quick review without expanding accordions
Correcting Mistakes:
- If you place a pin on the wrong spot, click elsewhere on the map before saving to move it
- After saving, use Edit to adjust the pin position if needed
- Use Delete if a location is no longer relevant or was added in error
Data Quality:
- Keep descriptions concise but informative (2-3 sentences ideal)
- Include dates when information is time-sensitive
- Note the source of information if relevant ("Client reported...", "Observed by outreach team...")
Frequently Asked Questions
Q: Can I add multiple pins for the same client?
A: Yes! Each client can have unlimited location pins. All pins for a client appear grouped under their name in the right panel accordion.
Q: What happens if I delete a location pin?
A: The pin is permanently removed from the map and the accordion. This action cannot be undone. If you might need the information later, use Hide instead of Delete.
Q: Can other team members see the location pins I add?
A: Yes, location pins are visible to all team members who have access to that client's case. This enables team coordination and shared location intelligence.
Q: What do the blue highlighted regions on the map represent?
A: The blue shaded regions and border lines likely represent County-level service areas or jurisdictional boundaries.
Q: Can I edit a location pin after saving it?
A: Yes, click the Edit button in the accordion entry for that location. You can update the title, description, and even move the pin to a new position on the map.
Q: Can I change which client a pin is associated with after saving?
A: Yes, use the Edit button and change the "Select Case" dropdown to assign the pin to a different client in your caseload.
Q: What's the difference between hiding and deleting a location?
A:
- Hide = Temporarily removes pin from map view but keeps all data. You can unhide anytime by clicking the eye icon.
- Delete = Permanently removes the location pin and all associated data. Cannot be undone.
Related Documents
- Health Record Accordion - Where the Locations button is located
- Case Page Overview - Understanding the Case Page layout