Case Page Overview
Last Updated: April 15, 2026
Document ID: UG-CASEPAGE-001
Version: 1.4
Overview
The Case Page provides a centralized workspace for managing a client's case. It combines task management, clinical records, documentation, team collaboration, and activity tracking into a single interface.
The Case Page features an icon-based tab navigation on the left side that organizes case information into five sections: Tasks, Health Record, Documents, Team, and Activity. Each section is accessible by clicking its tab icon
Note: The term "Case Page" refers to the detailed view of a single case. You access Case Pages from your caseload (the list of cases shown in Dashboard: My Caseload or Dashboard: My Performance).
This guide will cover:
- Accessing the Case Page from different locations
- Understanding the Case Page layout
- Using the Left Sidebar sections (Tasks, Health Record, Documents, Team, Activity)
- Working with the Main Content Area (Process Navigation Bar: Process, Stage, and Task views)
- Using the Right-Side Context Panel for client information
- Functional relationships between sections
2. Accessing the Case Page
You can open a Case Page from several locations in Conduit:
From Dashboard: My Overview
- Locate the case card you want to open
- Expand the case card by clicking anywhere on it or clicking the caret icon (▼)
- Click the Open Case button in the expanded card
For details, see Dashboard: My Overview - Expanding Case Cards.
From Dashboard: My Caseload
- Locate the case in the table
- Click on the Client Name in the Name column
- The Case Page opens
For details, see Dashboard: My Caseload.
From Dashboard: My Performance
- Locate the case in the performance view
- Click on the Client Name
- The Case Page opens
Note: My Performance uses the same table interface as My Caseload.
3. Understanding the Case Page Layout
The Case Page is organized into 2 primary sections for case-specific work:
- Main Content Area - Process Navigation Bar with Process, Stage, and Task views
- Right-Side Context Panel - Client information (EHR, Documents, Demographics, Key Dates)
Additional persistent navigation elements:
- Global Header - Displays client identification when a case is opened; provides access to other modules via hamburger menu. For details, see Navigation Toolbar
- Left Sidebar - Icon-based tab navigation for Tasks, Health Record, Documents, Team, and Activity sections (one section visible at a time)
4. Left Sidebar Sections
Location: Left side of Case Page (below Search field)
Purpose: Quick access to different aspects of case information
The Left Sidebar provides tab-based navigation between five sections. Click a tab icon to open its tab panel (the content display area) — only one tab panel is active at a time. Each tab icon shows a contextual tooltip describing its purpose:
- Tasks - "View and complete workflow tasks for this case"
- Health Record (EHR) - "Access electronic health records and patient information"
- Documents - "View, upload, and manage case documents"
- Team - "See team members assigned to this case"
- Activity - "Review case activity history and updates"
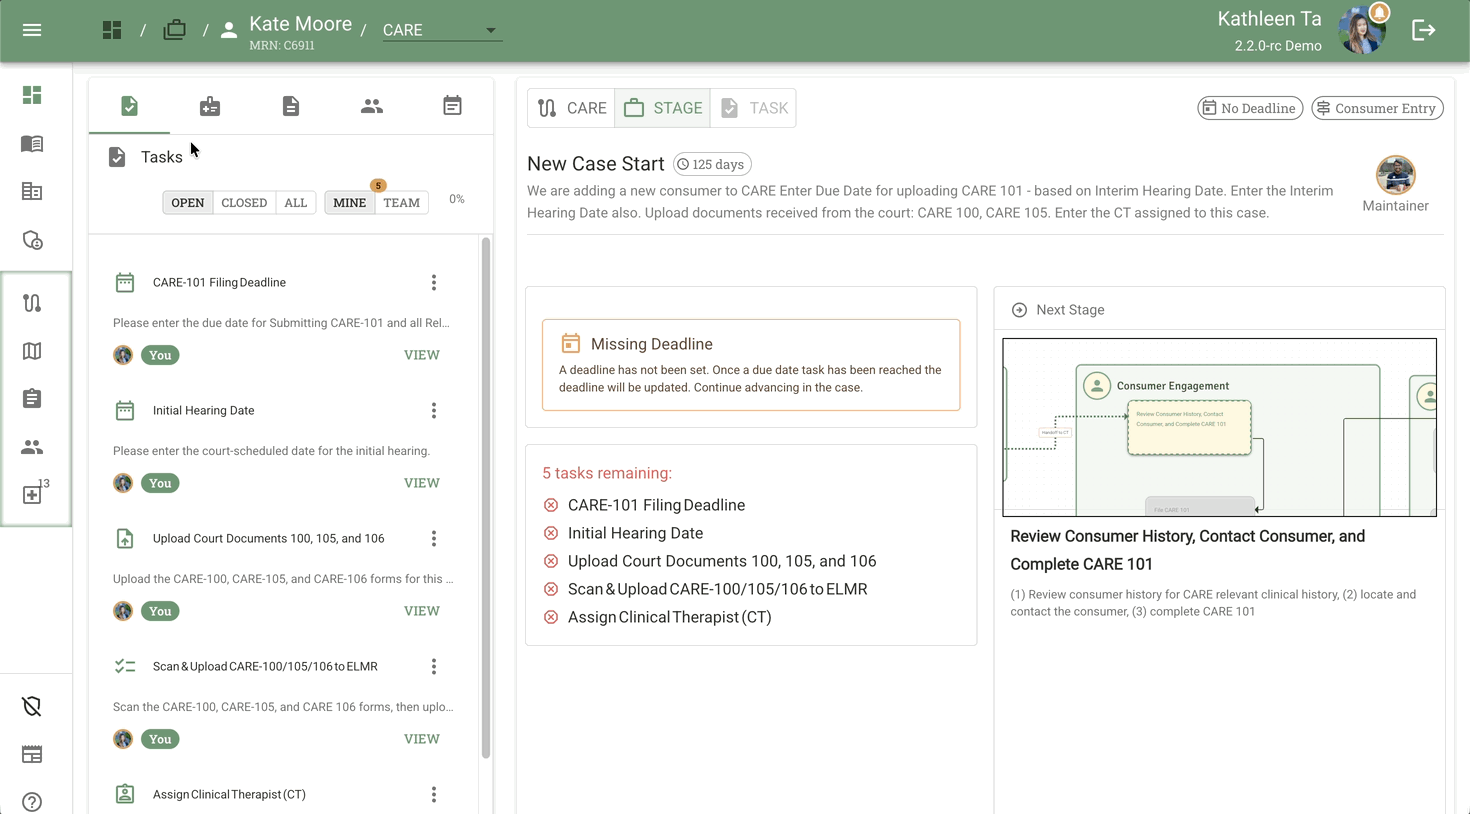
A. Tasks Tab
Icon: Clipboard/checkmark
Tooltip: "View and complete workflow tasks for this case"
Purpose: Displays case-related tasks assigned to users
Task Filtering Controls:
- OPEN / CLOSED / ALL - Filter by task status
- MINE / ALL - Show only your tasks or all team tasks
- Task count indicator - Orange badge showing number (e.g., "3")
- Progress indicator - Percentage completion (e.g., "17%")
Task Cards:
Each task entry displays:
- Task title (e.g., "Scan & Upload CARE-100/105/106 to ELMR")
- Brief description
- Assignee badge (e.g., photo of user or initials or "KD")
- "You" tag when assigned to current user
- Overflow menu (three vertical dots) for additional actions
- VIEW link to open task detail in Main Content Area
Selection:
- Selected task is highlighted with a blue outline
- Clicking a task loads its details in the Main Content Area
Screenshot: case-page_tasks-tab_01.png
For detailed documentation, see Task Management.
B. Health Record (EHR) Tab
Icon: Medical cross
Tooltip: "Access electronic health records and patient information"
Purpose: Provides access to clinical and EHR-related data
How it appears:
- In Left Sidebar: Click the Health Record tab icon to view full EHR information
- In Right-Side Panel: Automatically appears in split view (bottom section) when working on relevant tasks
When selected in Left Sidebar, this section allows access to:
- EHR - Electronic Health Record integration
- Demographics - Client demographic information
- Key Dates - Important dates related to the case
This section supports structured client data review rather than workflow tasks.
For detailed documentation, see Health Record.
C. Documents Tab
Icon: Document page
Tooltip: "View, upload, and manage case documents"
Purpose: Manage case-related documents and templates
Provides access to:
- Uploaded case documents
- Templates
- Preview and upload actions
- Document versioning
This section is distinct from Health Record and focuses on file-based artifacts.
For detailed documentation, see Documents and Resources.
D. Team Tab
Icon: Group of people
Tooltip: "See team members assigned to this case"
Purpose: Displays assigned staff and collaborators associated with the case
Allows visibility into:
- Case ownership
- Assigned clinical therapist
- Supervisory roles
- Care coordination participants
Supports accountability and collaboration.
For detailed documentation, see Team.
E. Activity Tab
Icon: Calendar or activity log symbol
Tooltip: "Review case activity history and updates"
Purpose: Displays historical case actions
Includes:
- Status changes
- Task completions
- User activity timestamps
- System-generated events
Functions as an audit trail.
For detailed documentation, see Activity.
5. Main Content Area – Process Navigation Bar
Location: Top of the Main Content Area
Purpose: Navigate between Process, Stage, and Task views; display deadline and status indicators
Components
Three Views:
- Process view ([Process Name], e.g., "CARE") — Displays the full Process Flow Diagram for the entire caseflow. This is the default view when opening a case. Provides access to the History button in the bottom-left of the Main Content Panel.
- Stage view — Scoped to the current active stage. Previews tasks remaining and shows the Deadlines alert.
- Task view — Opens in the Main Content Area when a specific task is selected from the Tasks tab panel.
Status Indicators:
- Deadlines chip - Displays nearest pending deadline with color-coded urgency:
- Grey (uncolored) = 10+ days remaining
- Amber/Yellow = 5-10 days remaining
- Red = Less than 5 days remaining
- Dark Red = Past due
- Text format: "Due MMM DD" (e.g., "Due Dec 15") or "Overdue X d" (e.g., "Overdue 2 d")
- Hover or click to see tooltip/popover with all upcoming deadlines, status, and descriptions
- Updates automatically: daily at midnight + real-time when deadlines change
- Process Status Chips - Show current Group information
History Feature
The History feature provides a structured, read-only view of the complete case timeline.
How to access:
- In the Process Navigation Bar, click the process name (e.g., "CARE") to open the Process view
- Click the green History button in the bottom-left of the Main Content Panel
- A full-screen pop-out opens titled "Case History"
What it shows:
- Episode count chip - Shows number of episodes in current stage
- Info button (green "i" with MUI icon) - Hover to see: "What is History? History shows the complete timeline of this case's progression through caseflows. Each episode represents a process flow version or migration event. Navigate through groups, stages, and tasks to see what was completed and when."
- Groups tooltip (info "i" on Caseflow Groups) - Hover to see: "About Groups - Navigate through caseflow groups in sequential order. Each group contains multiple stages that were executed together. Click any group to view its stages and tasks."
- Complete hierarchy: Episode → Group → Stage → Task → Activity
- Details: What was completed, when, and by whom
Viewing Previous Episodes:
When a case has been migrated to a different Process Flow, Case History preserves all previous episodes:
- Navigate between episodes - Access previous Process Flow versions
- Each stage shows detailed task history - See what tasks were completed, by whom, and when
- In-depth view of case journey - Complete audit trail of the case from creation through all migrations
- Read-only view - Previous episodes cannot be edited, ensuring data integrity
Use cases:
- Review work completed before a Migration transition
- Audit case progression for compliance
- Understand decision points that led to process changes
- Track team member contributions across different Process Flows
To exit: Click the gray "x" button in the top right corner to return to the previous view.
For more on the Episode/Group/Stage/Task hierarchy, see Cases Overview - Understanding Workflow Hierarchy. For information about Migration, see Process Flows Guide - Migration FAQ.
7. Section 4: Task Detail Panel / Stage Overview
Location: Right side or main content area
Purpose: Display task details, stage overview, or work area depending on current tab
Default View: Stage Overview
When you first open a Case Page (defaulting to the Stage tab), Section 4 displays a Stage Overview with more comprehensive information than the visual stage progress indicator.
Stage Overview Components
- Process version indicator (top) - Shows the current process version (e.g., "CARE 1.2.1") - Always displays the version of the process you're currently working on
- Cog icon (top right) - Access to Migration feature (only visible based on user permissions and abilities)
- Alert chips (if applicable) - Case-specific alerts displayed prominently:
- Missing deadlines
- Overdue items
- Other case-specific issues
- May not always be present if the case has no alerts
- Task status summary - Overview text summarizing all tasks in the current stage
- Will eventually convert to interactive checkboxes for quick status updates
- Stage description - Text summary standardized per process (useful for debugging or understanding stage requirements)
This overview provides a front-and-center view of the stage's status every time you land on the case page, helping you quickly understand what needs attention.
Task Detail Panel
The Task Detail Panel displays when you click a task from the Tasks tab or navigate to the Task tab.
Resizable Split Pane Layout:
The task editing workspace uses a resizable split pane:
- Left/top pane: Stage context — stage name, task list, and documents
- Right/bottom pane: The active task form
Drag the divider to adjust the split ratio. Your preferred ratio is saved automatically and persists across page refreshes.
Task Header (Consistent Across All Task Types)
Always visible:
- Task title
- Full task description
- Assignee - Who is responsible for this task
Action Buttons:
-
Refresh button - Reloads the task and pulls in changes made by other users
- Use this if you see "This task has already been completed" message
- Prevents overwriting someone else's work
- Updates UI to show current task state
-
Assign button - Reassign the task to another team member
When Task is Complete:
- UI becomes read-only and grayed out
- Shows who completed the task and when
- Reopen Task button appears next to where "Save & Complete" was
- Only available while the current stage is active
- Located in the Task Body area
URL Behavior:
- When you click a task, the URL updates to include the Task ID
- This allows you to share a direct link to a specific task with another user
Task Body (Varies by Task Type)
The Task Body contains the actual work area, which varies depending on the task type. Conduit supports 5 task types:
- Checklist Task - Simple list of checkboxes to complete
- Document Upload Task - Predefined slots for required document uploads with preview and validation
- Date Entry Task - Single date picker that drives deadline objects
- Outcome Task - Dropdown + date + notes (auto-saves on blur, determines workflow routing)
- Next Stage Task - Controls stage transition, requires all prerequisites to be completed
For detailed information about each task type, filters, and workflows, see Task Management.
6. Right-Side Context Panel (Split View for Task Types)
Location: Right panel of the Case Page
Purpose: Provides contextual client data without leaving the task screen
The Right-Side Context Panel displays different views depending on the task type you're working on:
Split View (Documents and EHR)
When working on Outcome, Checklist, Due Date, or Document Upload task types, the Right-Side Context Panel automatically displays a split view with two sections:
- Documents Section (Top) - Quick access to case documents
- EHR Section (Bottom) - Electronic Health Record integration and clinical data
This split view ensures you have immediate access to relevant documents and health records while completing these task types, eliminating the need to switch between tabs.
Future Enhancement: These sections will highlight or emphasize particular fields suggested for the specific task you're working on.
Standard View (NextStage Task Type)
When working on NextStage task types, the Right-Side Context Panel displays the standard tabbed interface:
Four Tabs Available:
- EHR - Electronic Health Record integration and clinical data
- DOCUMENTS - Quick access to case documents
- DEMOGRAPHICS - Basic client information
- KEY DATES - Important dates related to the case
Demographics View
When the Demographics tab is selected (or when viewing outside of task context), the panel displays client information organized into sections:
Basic Information
- Client Identification: Unique ID (e.g., "C1472")
- First Name: Client's first name (e.g., "Grace")
- Last Name: Client's last name (e.g., "Moore")
- Date of Birth: Birth date (e.g., "07/12/1991")
- Age: Calculated age (e.g., "34 years")
- Social Security Number: SSN (if available)
Contact Information
- Phone: Contact phone number
- Email: Email address
- Address: Physical address
- County: County of residence
💡 Tip: The Right-Side Context Panel automatically adapts based on the task type you're working on, showing the most relevant information for that task.
7. Functional Relationships Between Sections
Understanding how the sections work together helps you navigate the Case Page efficiently:
| Section | Primary Function | Data Type |
|---|---|---|
| Tasks | Workflow execution | Structured checklist items |
| Health Record | Clinical data review | Medical/EHR records |
| Documents | File management | Uploaded forms & templates |
| Team | Role visibility | Assigned personnel |
| Activity | Audit trail | Historical events |
Key Design Principles:
-
Separation of Workflow vs. Clinical Data
- Tasks are operational (action-oriented)
- Health Record is clinical reference (information-oriented)
-
Persistent Context
- Client information remains visible in Right-Side Panel while performing tasks
- Panel adapts to show Documents and EHR split view for most task types
- Global Header provides consistent client identification across all views
-
Clear Ownership
- "Assigned to You" indicator improves accountability
- Assignee badges show task responsibility
-
Action-Oriented Interface
- Checklists + Save & Complete reinforce structured execution
- Auto-save preserves draft work for most task types
- Concurrent edit detection prevents accidental data loss
-
Auditability
- Activity and History features support compliance tracking
- Complete audit trail of case actions and team contributions
8. Tips and Best Practices
Navigation Tips
- Use the Search Bar at the top of the Left Sidebar to quickly find specific tasks or documents
- Click tab icons to switch between Tasks, Health Record, Documents, Team, and Activity — one section is visible at a time
- Use the Right-Side Context Panel to reference client information while working on tasks
Workflow Tips
- Check the Task Progress indicator in the Tasks section to see stage completion status
- Monitor task count badges (orange indicators) for quick status awareness
- Review the Activity section to understand recent case history
- Use the Process Navigation Bar to switch between Process, Stage, and Task views
Performance Tips
- Use the Search Bar to quickly locate specific tasks or documents
- Keep the Right-Side Context Panel visible for easy access to client information
- Use the TASK tab view for focused work execution
9. Frequently Asked Questions
Q: What's the difference between "Cases" and "Case Page"?
A:
- Cases (or Caseload) - Your list of cases shown in Dashboard: My Caseload or Dashboard: My Performance
- Case Page - The detailed view of a single case focusing on the Main Content Area and Right-Side Context Panel for case work
You access a Case Page by clicking on a case from your caseload.
Q: What are the main sections of the Case Page?
A: The Case Page has two primary work areas:
- Main Content Area - Process Navigation Bar with Process, Stage, and Task views
- Right-Side Context Panel - Client information (EHR, Documents, Demographics, Key Dates)
Additional navigation is provided by the Left Sidebar (Tasks, Health Record, Documents, Team, Activity sections) and the Global Header (which displays client identification once a case is opened).
Q: How do I switch between different case sections?
A: Click the icon tabs in the Left Sidebar to switch between Tasks, Health Record, Documents, Team, and Activity. Each icon represents a different section of case information.
Q: What's the difference between Activity and History?
A:
- Activity (in Left Sidebar) - Quick chronological list of recent case events
- History (accessed via the History button in the Process view of the Process Navigation Bar) - Full-screen structured view showing complete Episode → Group → Stage → Task hierarchy
Use Activity for quick recent updates; use History for comprehensive case timeline analysis.
Q: Why can't I see all sections in the Left Sidebar?
A: Some sections may be hidden based on:
- Your user permissions
- The case's process flow type (some flows don't include all sections)
Contact your system administrator if you believe you should have access to a section that isn't visible.
Q: What does the task progress percentage represent?
A: The task progress percentage in the Tasks section is stage-level and global - it shows the total progress made by ALL users working on tasks in that stage, not just your individual assigned work. This helps teams coordinate and understand overall case status.
Q: How can I see client information while working on a task?
A: The Right-Side Context Panel automatically displays relevant client information based on the task type:
- For Outcome, Checklist, Due Date, and Document Upload tasks: The panel shows a split view with Documents (top) and EHR (bottom) sections
- For NextStage tasks: The panel shows the standard tabbed interface (EHR, Documents, Demographics, Key Dates) This panel persists as you navigate between tasks, eliminating the need to switch views.
Q: Does my Search Bar query persist when I navigate away?
A: No. Search queries reset when you leave the Case Page. When you return, you'll need to enter your search again if needed.
Q: What's the difference between Person ID, Client ID, and EHR Client ID?
A: These are all the same unique identifier, just displayed in different locations:
- Person ID - appears on the case card in Dashboard views
- Client ID - appears in the My Caseload table
- EHR Client ID - appears in the Health Record section
💡 Tip: This number uniquely identifies the person across all views in Conduit and external systems.
Q: Can I share a direct link to a specific task?
A: Yes! When you click a task, the URL updates to include the Task ID. You can copy and share this URL with team members to give them direct access to that specific task.
Related Documents
- Dashboard: My Overview - Opening cases from swimlane view
- Dashboard: Case Cards - Understanding case card anatomy and expanding cards
- Dashboard: My Caseload - Opening cases from table view (also applies to My Performance)
- Task Management - Working with tasks on the Case Page
- Documents and Resources - Managing documents on the Case Page
- Health Record - Understanding health record chips and ELMR connection
- Team - Managing Active Contributors
- Activity - Reviewing case activity history
- Cases Overview - Understanding case concepts