Tasks
Last Updated: April 15, 2026
Document ID: UG-CASEPAGE-002
Version: 1.3
Overview
The Tasks tab in the Left Sidebar displays all tasks associated with a case, organized by process stage. Tasks are the atomic units of work within Conduit—each task represents a specific action that must be completed to advance the case through its workflow.
Icon: Clipboard/checkmark
Tooltip: "View and complete workflow tasks for this case"
This guide will cover:
- Understanding the Task tab and task card layout
- Using task filters (Open, Closed, All) and the Mine/All toggle
- Understanding the Task Detail Panel structure
- Working with 5 different task types
- Using Refresh and Assign buttons
- Reopening completed tasks
- Understanding URL behavior and task sharing
Key Terms
| Term | Definition |
|---|---|
| Task | Individual work item within a Stage, assigned to specific team members |
| Task Type | Category defining what kind of work the task requires (5 types: Checklist, Document Upload, etc.) |
| Task Filter | View control showing Open (yours), Closed (all completed), or All tasks in the stage |
| Task Header | Consistent top section showing title, description, assignee, and action buttons |
| Task Body | Work area that varies by task type (checkboxes, upload slots, date pickers, etc.) |
| Stage Progress | Global percentage showing completion across all users working on the stage |
| Refresh | Button that reloads task to pull in changes made by other users |
| Assign | Button to reassign a task to a different team member |
| Reopen Task | Action to reactivate a completed task (only available while stage is active) |
| Auto-save | Automatic saving of partial work (on blur) for certain task types |
Understanding the Task Detail Panel
When you click a task from the Tasks tab, the Task Detail Panel opens in the Main Content Area.
The Task Detail Panel has two main parts:
- Task Header - Consistent across all task types
- Task Body - Varies depending on task type
Right-Side Context Panel Behavior:
When viewing a task, the Right-Side Context Panel automatically adapts based on task type:
- Outcome, Checklist, Due Date, Document Upload tasks: Shows split view with Documents and EHR sections
This provides immediate access to relevant documents and health records without switching views.
Task Header (Consistent Across All Task Types)
The Task Header appears at the top of every task and contains:
Always Visible Elements
Task Title:
- The name of the task
- Brief identifier of what needs to be done
Full Task Description:
- Detailed instructions for completing the task
- May include guidance, requirements, or context
Assignee:
- Shows who is responsible for completing this task
- Displays the assigned team member's name
Task Header Button
Assign Button
Purpose: Reassign the task to another team member
Two ways to assign tasks:
- From task detail panel: Click the Assign button in the task header (when viewing the task)
- From task list: Right-click on a task in the Tasks tab to access assignment options
When to use:
- Task needs to be handled by someone with different expertise
- Original assignee is unavailable
- Workload needs to be redistributed
How it works:
- Click the Assign button (or right-click from list)
- Select a team member from the dropdown
- Task is reassigned immediately
- New assignee sees the task in their "Open" filter
- Previous assignee will see the task move to the "All" filter (no longer in their "Open" tasks)
Two Methods to Take On Work
There are two distinct methods for taking on tasks in Conduit, each serving a different purpose:
Method 1: Assign Task to Yourself
When you want to take ownership of a task and have it appear in your "Open" tasks:
- Navigate to the Case Page
- Find the task you want to take on
- Click the task to open it in the Task Detail Panel
- Click the Assign button in the task header
- Select your name from the dropdown
- Click Assign to confirm
- The task now appears in your "Open" filter
Alternative method:
- Click the 3-dot menu (⋮) to the right of a task in the task list
- Select Assign from the dropdown
- A popup appears in the center of the screen
- Select a team member from the dropdown
- Click Assign below the dropdown to confirm
Use when:
- You want the task to appear in your personal caseload
- You're formally taking over the task from another team member
- You need visibility of this task in your Dashboard: My Overview
Method 2: Save & Complete on Behalf of Assignee
When you need to complete a task that's assigned to someone else but you want them to receive credit:
- Navigate to the task assigned to the other team member
- Complete the required fields or upload documents
- Click Save & Complete
- The task completes and the original assignee receives credit
Use when:
- The assignee has already done the work but needs help with system entry
- You're completing a task for someone who is unavailable but should receive credit
- You need to advance the case quickly without formal reassignment
Example: User Karan Dorn navigated to a client's case page and found a task assigned to his colleague Sarah Chen. He completed the task on her behalf, and when he clicked "Save & Complete," Sarah received credit for the task completion even though Karan Dorn did the data entry.
💡 Tip: Method 1 changes task ownership (you become the assignee), while Method 2 preserves the original assignee and gives them credit for the completion.
When Task is Completed
Once a task is marked complete, the Task Detail Panel changes:
Visual Changes:
- UI becomes read-only and grayed out
- All form fields become uneditable
- Buttons are disabled (except Reopen)
Information Displayed:
- Who completed it - Team member's name
- When it was completed - Date and time stamp
Reopen Task Button:
- Appears where "Save & Complete" button was located (in the Task Body section)
- Only available while the current stage is active
- Allows you to reactivate the task if corrections are needed
URL Behavior and Task Sharing
Automatic URL Updates
When you click a task to open it in the Task Detail Panel:
- The page URL automatically updates to include the Task ID
- Example:
https://yourorg.conduit.app/cases/12345?task=67890 - This URL remains in your browser's address bar
Sharing Task Links
You can share direct task links with team members:
- Click a task to open it
- Copy the URL from your browser's address bar
- Share the URL via email, chat, or other communication tools
- When a teammate clicks the link, they go directly to that specific task
Use cases:
- "Can you review this task?" - Send direct link
- Discussing a specific task in a meeting - Share the URL
- Documentation or training - Reference specific task examples
💡 Tip: Direct task links save time and ensure everyone is looking at the same task without having to navigate through the case structure.
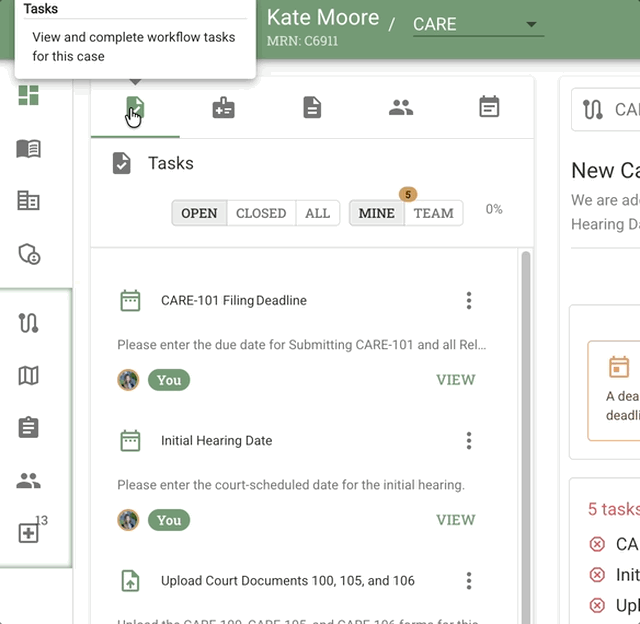
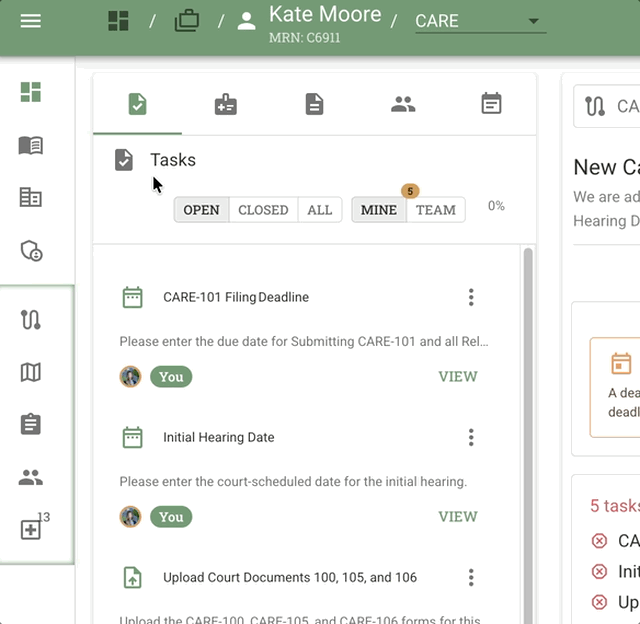
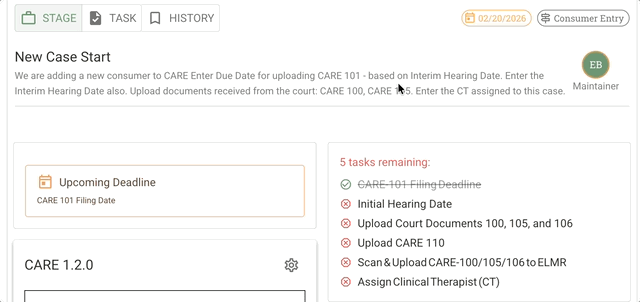
Task Filters
Task Counts and Progress
At the top of the Tasks tab, you'll see two at-a-glance indicators:
- Task count indicator - Orange badge showing the number of tasks in the current stage (e.g., "3")
- Progress indicator - Percentage completion for the current stage (e.g., "17%")
Note: This percentage is STAGE-LEVEL and GLOBAL - it represents the total progress made by all users on all tasks in the stage, not just your individual assigned work.
Why this matters:
- Helps teams coordinate and understand overall case progress
- Shows when a stage is ready to advance
- Indicates team workload and completion status
For more on the Episode/Group/Stage/Task hierarchy, see Cases Overview - Understanding Workflow Hierarchy.
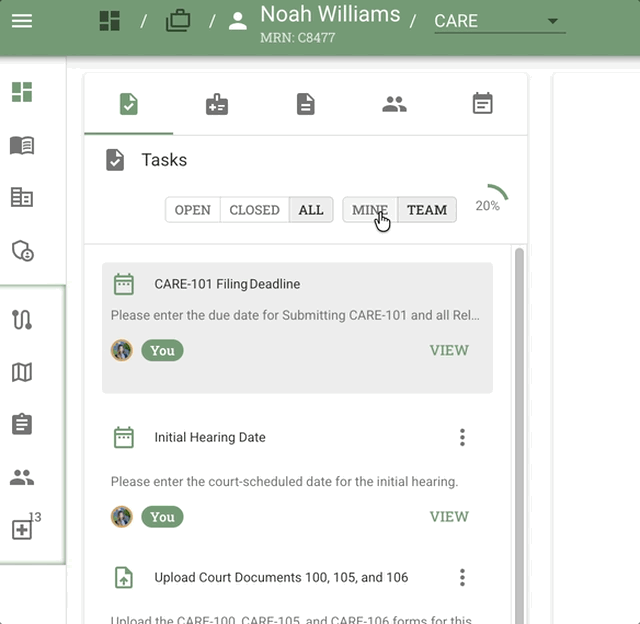
Filter Controls
Two sets of filters let you control which tasks are displayed:
- OPEN / CLOSED / ALL - Filter by task status
- MINE / ALL - Show only your tasks or all team tasks
Each filter has a hover tooltip explaining what it shows.
Task Cards
Each task entry in the Tasks tab displays:
- Task title (e.g., "Scan & Upload CARE-100/105/106 to ELMR")
- Brief description
- Assignee badge - Photo, initials, or "KD" style identifier
- "You" tag - Shown when the task is assigned to the current user
- Overflow menu (three vertical dots) - Additional actions
- VIEW link - Opens task detail in the Main Content Area
Selection: The selected task is highlighted with a blue outline. Clicking a task loads its details in the Main Content Area.
Open Tasks Filter (OPEN)
Shows: Tasks explicitly assigned to YOU (the currently logged-in user) that are not yet complete
Hover tooltip: "Shows only your open tasks"
When to use:
- You want to see only your assigned work
- You're focusing on what you need to complete
- You're prioritizing your personal task list
What's filtered:
This filter is smart - it shows you only the work you're directly responsible for. If you're the maintainer of a stage but don't have any specific tasks assigned to you, those won't show in the Open filter. You'll need to use the "All" filter to see everything happening in the stage.
Closed Tasks Filter
Shows: All completed tasks in this stage (regardless of who completed them)
When to use:
- You want to see what work has been finished
- You're reviewing stage progress
- You need to verify a task was completed
Important: This shows ALL closed tasks from all users in the stage, not just your completed tasks.
All Tasks Filter
Shows: Every task in this stage - both open and closed, yours and others'
When to use:
- You want a complete view of stage workload
- You're coordinating with team members
- You need to understand the full scope of work in the stage
Important: This combines both open and closed tasks from all users in the stage.
Transitioning Between Views
When you're viewing the Stage tab and click a task from the Tasks tab, Conduit automatically transitions you to the Task tab to help you focus on your work.
What happens:
- You click a task from the Tasks tab (while on Stage tab)
- The view automatically switches to the Task tab
- The Task Detail Panel (Section 4) displays your selected task
- This creates a focused working area for completing that task
This automatic transition helps you concentrate on the task at hand without manual navigation between tabs.
The 5 Task Types
Conduit supports five distinct task types, each designed for specific kinds of work. The Task Body (the work area below the Task Header) changes based on the task type.
1. Checklist Task
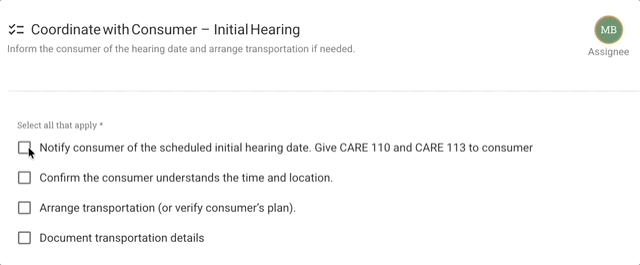
Purpose: Simple list of items that need to be completed
Task Body contains:
- List of checkbox items
- Each item represents a discrete action or verification
- All items visible at once
How to complete:
- Review each checkbox item
- Check the boxes for items you've completed
- Once all required boxes are checked, click Save & Complete
Example use cases:
- Pre-interview preparation checklist
- Document verification list
- Safety assessment items
- Compliance requirements
💡 Tip: Some checklist tasks may have optional items - check the task description to understand which items are required.
2. Document Upload Task
Purpose: Upload required documents with predefined slots and validation
Task Body contains:
- Predefined document slots for expected uploads
- Each slot specifies what document type is needed
- Preview capability for documents before and after upload
- Validation to ensure expected documents are present
How to complete:
- Review the required document slots
- Click on a slot to upload the corresponding document
- Preview the uploaded document to verify it's correct
- Repeat for all required document slots
- Once all required documents are uploaded and validated, click Save & Complete
File type requirements:
Conduit currently accepts PDF and DOCX file types for document upload tasks. While the system validates file types, it's up to you to ensure:
- You're uploading the document to the correct slot
- The document matches what's expected for that slot
- You're replacing the intended document if updating an existing upload
Caution: The system validates file type but doesn't automatically verify that you've uploaded the correct document to the correct slot. Always double-check your uploads to prevent errors.
Visual feedback:
- Before upload: Document name and description box appears in orange in the task detail pane
- After upload: Color changes from orange to default background color
- Version number: Updates to show current version (e.g., "Version 2")
Example use cases:
- ID verification uploads
- Medical records submission
- Signed consent forms
- Supporting documentation
Important: This task type validates that expected documents are present before allowing stage advancement. Similar to the document-related UI patterns used elsewhere in Conduit.
3. Date Entry Task (Due Date Task)
Purpose: Set a key deadline that drives case timing
Task Body contains:
- Single date picker input field
- Instructions for what date to enter
- Context about how this date affects the case
How to complete:
You have two ways to enter the date:
| Method 1: Type the date directly | Method 2: Use the calendar picker |
|---|---|
| Type the date into the text field (e.g., "01/15/2026") | Click the calendar icon on the right side of the text box to select from a calendar picker |
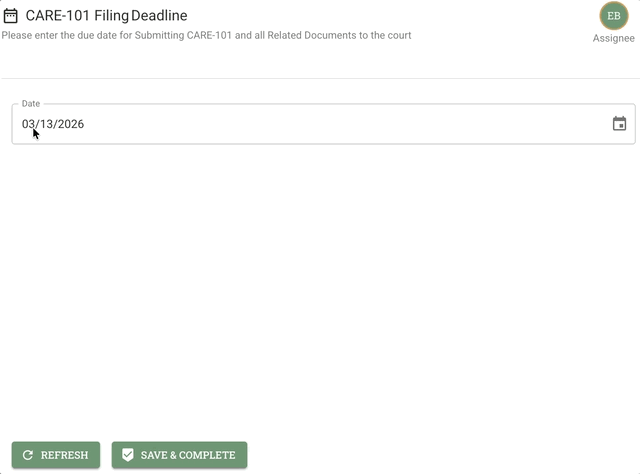 |  |
After entering the date:
- The selected date updates the case's deadline
- Click Save & Complete
Example use cases:
- Setting court hearing dates
- Scheduling follow-up appointments
- Establishing program enrollment deadlines
- Recording important milestone dates
Critical: These tasks are important because they determine when time-based rules and reminders start. The date you enter here drives deadline calculations throughout the case.
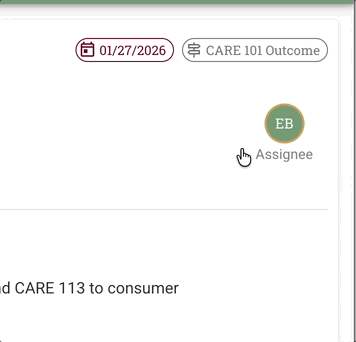
4. Outcome Task (Branching Task)
Purpose: Determine which path the case follows next in the workflow
Task Body contains:
- Outcome dropdown - Select from predefined choices (e.g., Continue, Dismissed, etc.)
- Date field - When did this outcome occur?
- Free-response textbox - Add notes or explanation
How to complete:
- Select an Outcome from the dropdown (e.g., "Approved," "Denied," "Needs More Information")
- Enter the date when the outcome was determined
- Add notes in the textbox to document your decision or provide context
- The system auto-saves as you enter information (blur-based saving)
- Click Save & Complete to finalize
Example use cases:
- Eligibility determination (Approved/Denied)
- Appeal decisions
- Assessment results
- Case disposition
Special Behavior:
- Auto-saves on blur - Partial progress isn't lost if you navigate away
- Routes workflow - Your outcome selection determines which stage comes next
- Branching logic - Different outcomes may lead to completely different workflow paths
💡 Tip: The outcome you choose here directly influences where the case goes next, so review your selection carefully before completing the task.
5. Next Stage Task
Purpose: Control the transition to the next stage in the workflow
Task Body contains:
- Prerequisites check - Lists all tasks that must be completed before advancing
- Maintainer selection - Dropdown to choose who will own the next stage
- Next stage preview - Shows what tasks will appear in the next stage
- Completion requirements - What must be done beforehand
How to complete:
- Review the prerequisites - The UI tells you what remains incomplete
- If prerequisites are not met:
- Complete or assign remaining tasks first
- You cannot advance until prerequisites are satisfied
- Once prerequisites are met:
- Select a maintainer for the next stage from the dropdown (e.g., "Alex")
- Review what tasks will appear next
- Review completion requirements
- Click Save & Complete to advance the stage
Example use cases:
- Moving from Assessment to Service Delivery
- Transitioning from Active to Case Closure
- Advancing through approval stages
- Progressing to next phase of care
UI Confirmation:
When ready to advance, the task shows:
- Who will own the next stage (selected maintainer)
- What tasks will appear next (preview)
- What must be completed beforehand (prerequisite summary)
Important: This task often includes helpful guidance in the description to clarify expectations before moving forward. Read the full task description carefully.
Completing and Refreshing Tasks
At the bottom of the Task Detail Panel, you'll find action buttons for completing and refreshing tasks.
Refresh Button
Location: Green button at the bottom right of the Task Detail Panel, next to the "Save & Complete" button
Purpose: Reloads the task and pulls in any changes made by other users
When to use:
- You see the message "This task has already been completed"
- Another user may have worked on the task simultaneously
- You want to ensure you have the latest task state before making changes
- You see a "Task Synced" or "Draft saved" notification and want to clear it
What it does:
- Fetches current task data from the server
- Updates the UI to show the latest state
- Prevents you from overwriting another user's work
- Clears sync notifications
About real-time sync:
Conduit automatically detects when another user is working on the same task and shows you sync notifications:
- "Draft saved" - Your changes have been saved as a draft
- "Task synced" - The task has been updated with another user's changes
When you see these notifications, the system shows you who submitted the changes (not just who edited last). Refreshing the page will always grab the latest changes and make the toast notification go away.
Tips and Best Practices
Task Management Tips
- Use filters strategically - Switch to "Open" to focus on your work, "All" to coordinate with team
- Refresh before editing - If you've been away from a task, click Refresh to ensure you have the latest state
- Share task URLs - Direct links save navigation time when discussing specific tasks
- Read descriptions carefully - Especially for Outcome and Next Stage tasks that affect workflow routing
Collaboration Tips
- Check "All" filter - See what teammates are working on to avoid duplication
- Use Assign button - Don't let tasks sit if someone else is better suited to complete them
- Monitor stage progress - The global percentage helps coordinate team completion efforts
- Communicate via notes - Use free-text fields in Outcome tasks to document decisions
Workflow Tips
- Complete Date Entry tasks early - These drive deadline calculations, so set them promptly
- Validate Document Uploads - Use preview feature to ensure correct documents before completing
- Review Next Stage prerequisites - Plan ahead so you're not blocked when ready to advance
- Reopen only when necessary - Reopening tasks affects stage completion calculations
Frequently Asked Questions
Q: What does "Open" tasks mean exactly?
A: The "Open" filter shows only tasks explicitly assigned to YOU (the currently logged-in user) that are not yet complete. It does NOT show all open tasks in the stage - only yours.
Q: Can I see other team members' tasks?
A: Yes! Switch to the "All" filter to see every task in the stage, including those assigned to other team members.
Q: What happens if I try to complete a task someone else just finished?
A: You'll see a message saying "This task has already been completed." Click the Refresh button to reload the task and see its completed state. This prevents you from overwriting their work.
Q: How do I know if someone else changed something I was working on?
A: Conduit shows real-time sync notifications when another user makes changes:
- "Task synced" toast appears when someone else updates the task you're viewing
- "Draft saved" appears when your changes are saved
- The notification shows who submitted the changes (not just who edited last)
What triggers sync notifications:
- Another user completes the task
- Someone uploads a document to the case
- The stage gets completed
- Any case-wide updates occur
To see the changes: Click the Refresh button or refresh your browser. This grabs the latest updates and clears the toast notification.
Auto-refresh behavior: When a stage gets completed, the entire Case Page will automatically refresh to show the new state.
Q: What does the task progress percentage represent?
A: It's a stage-level, global percentage showing progress made by ALL users on ALL tasks in the stage. It's not just your individual progress.
Q: Can I reopen a task after marking it complete?
A: Yes, but only while the current stage is active. Once the stage has advanced, you cannot reopen tasks from previous stages. A Reopen Task button appears where the "Save & Complete" button was.
Q: What is auto-save and which tasks use it?
A: Auto-save (blur-based saving) automatically saves your partial work when you click away from a field. Outcome Tasks use auto-save so you don't lose progress if you navigate away before completing.
Q: How do I share a specific task with a teammate?
A: Click the task to open it, then copy the URL from your browser's address bar. The URL includes the Task ID and will take them directly to that task when they click it.
Q: What determines which workflow path the case follows?
A: Outcome Tasks (Task Type 4) determine workflow routing. The outcome you select (Approved, Denied, etc.) tells the system which stage comes next.
Q: Can I advance to the next stage if tasks are incomplete?
A: No. The Next Stage Task checks prerequisites and won't allow advancement until all required tasks are completed. The UI will show you what remains to be done.
Q: What's the difference between the Tasks tab and Task Detail Panel?
A:
- Tasks tab (Left Sidebar) - Shows your task list with filters and stage progress. This is where you browse and select tasks.
- Task view (in Process Navigation Bar) - Opens in the Main Content Area when a task is selected; accessible when navigating via direct URL
- Task Detail Panel (Section 4) - Shows the full task interface when you click a specific task to work on it
URL behavior: When you click a task, the URL updates with the task ID (e.g., ?task=12345). If you refresh the page with this URL, it automatically opens to the Task view with that specific task loaded in the Main Content Area.
Q: Can I share a task link that opens directly to that task?
A: Yes! When you click a task, the URL updates to include the task ID. Copy that URL and share it with teammates. When they click the link, it will automatically navigate to the Task view and open that specific task in the Main Content Area - no manual navigation needed.
Related Documents
- Case Page Overview - Understanding the 4-section Case Page layout
- Documents and Resources - Managing documents on the Case Page
- Cases Overview - Workflow Hierarchy - Understanding Episode/Group/Stage/Task structure