Health Record
Last Updated: April 15, 2026
Document ID: UG-CASEPAGE-001
Version: 1.3
Overview
The Health Record feature on the Case Page provides access to health-related information, demographic data, deadlines, and location management. Health Record information can be accessed in two different contexts depending on your workflow needs.
When you access Health Record, you'll see three tabs:
- Health Record tab - Demographics and EHR-connected health information (may include additional tabs based on organization settings)
- Deadlines tab - All case deadlines with pinned and flow-based views
- Locations tab - Address management and map view
Each tab includes a ? icon with hover tooltips to explain what that section contains.
This guide will cover:
- Accessing Health Record from the Left Sidebar and Right-Side Panel
- Understanding ELMR chip and EHR connections
- Navigating the three main tabs (Health Record, Deadlines, Locations)
- Viewing Demographics and potential additional health information
- Managing deadlines and understanding their workflow context
- Working with location pins and visibility settings
How to Access Health Record
Health Record information appears in two different contexts within Conduit:
From the Left Sidebar (Full Health Record Interface)
Purpose: Complete access to all health information, including Demographics, EHR data, Deadlines, and Locations
How to access:
- Navigate to any Case Page
- Click the Health Record icon in the Left Sidebar (medical cross icon)
- The Health Record tab opens, displaying the full interface
When to use:
- You need to review comprehensive Demographics information
- You're managing Deadlines across multiple stages
- You need to update Locations or view the map
- You want to access additional EHR tabs (if configured)
What you'll see:
- Full tabbed interface: Health Record, Deadlines, Locations
- ELMR chip indicator (if EHR connected)
- Complete Demographics and health data
- All deadline management tools
In the Right-Side Context Panel (Quick Access During Tasks)
Purpose: Quick access to essential health record information while working on tasks
How it appears:
When working on Outcome, Checklist, Due Date, or Document Upload task types, the Right-Side Context Panel automatically displays a split view with EHR information in the bottom section.
When to use:
- You're completing a task and need to reference client demographics
- You want to verify health information while entering task data
- You need quick access to clinical data without leaving your task
What you'll see:
- Abbreviated EHR view (bottom section of split view)
- Essential demographics and health data
- Documents section above for additional context
💡 Tip: Both views access the same health record data. Use the Left Sidebar for comprehensive health information management and the Right-Side Panel for quick task-related reference.
For more on the Right-Side Context Panel, see Case Page Overview - Right-Side Context Panel.
Key Terms
| Term | Definition |
|---|---|
| ELMR | Electronic Health Records system identifier chip |
| EHR | Electronic Health Record - external system providing client health data |
| Demographics | Client identification and personal information within Health Record tab |
| Deadlines | Time-based requirements spanning multiple stages or groups in the case workflow |
| Locations | Physical addresses and map pins, managed through the Locations tab |
| Read-only | Data sourced from EHR that cannot be edited within Conduit |
| Pinned Deadline | Deadline marked as high priority, shown at the top of the Deadlines tab |
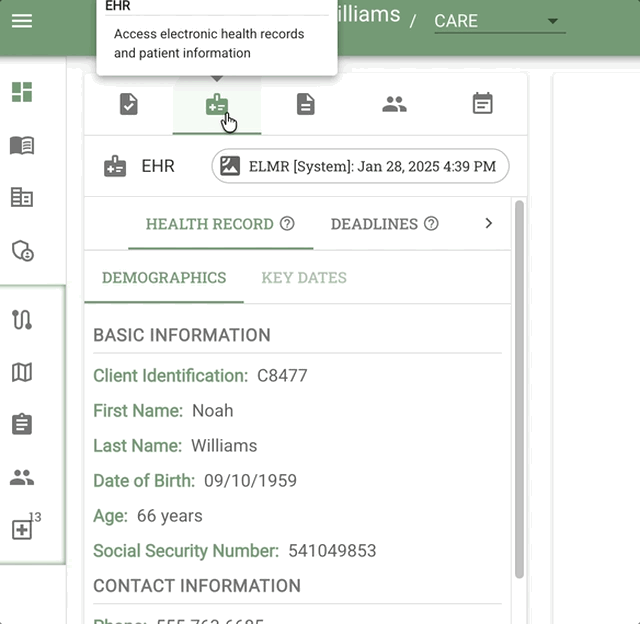
Health Record Tab Header
ELMR Chip
What it shows:
- Electronic Health Records connection status
- Small chip/badge indicator in the tab header
Hover tooltip text:
"Connected to ELMR for Electronic Health Records"
Purpose:
- Indicates the case has linked health records from an external system
- Provides quick visual confirmation of EHR integration
Expanded View: Three Main Tabs
When you open the Health Record tab from the Left Sidebar, you'll see three tabs at the top of the viewer. Each tab has a ? icon that displays helpful information when you hover over it.
Tab 1: Health Record
Purpose: Display client health and demographic information sourced from your EHR system
Default view: Demographics subtab (auto-selected)
Patient header:
At the top of the Health Record tab, the patient header displays:
- Patient name (prominently displayed)
- MRN (Medical Record Number) — shown directly below the patient name when available
- External ID — displayed below the patient name when the case is linked to an external system
The Health Record tab contains two subtabs:
Subtab: Demographics
Displays client identification and personal information sourced from your EHR system. All data is read-only. See Demographics Information Fields for the complete field list.
Subtab: Key Dates
Purpose: View temporal information from the patient's health record in one place
What you'll see:
Consolidates date-based fields from the EHR record — such as admission dates, discharge dates, referral dates, and other program-specific temporal milestones — into a single, easy-to-scan view.
Important: All data in the Key Dates subtab is read-only and sourced from the connected EHR system. To update date information, changes must be made in the source EHR system.
Use case:
- Quickly review all key dates for a client without scrolling through the full Demographics view
- Verify timeline information while completing tasks or filling out assessments
Potential additional subtabs: Depending on your organization's EHR integration, you may see additional subtabs such as:
- Medication History
- Lab Results
- Clinical Notes
- Other health information your organization has configured
Important: All information in the Health Record tab comes from your EHR system and is read-only in Conduit. To update this information, you'll need to make changes in your source EHR system.
Tab 2: Deadlines
Purpose: View and manage all case deadlines in one centralized location
What you'll see:
- Pinned deadlines (top section) - High-priority deadlines marked for quick access
- All deadlines (below) - Complete flow of every possible deadline in this process
Understanding deadline display:
The Deadlines tab shows you the entirety of every possible deadline in your process (e.g., all CARE deadlines). This doesn't mean all deadlines will be triggered - some are just "slots" that may or may not be encountered depending on how you traverse through the workflow.
For example, you might never actually reach "Psychiatric Report" deadline if you take a different path through the process. When viewing this retrospectively, you'll be able to see which dates were actually logged versus which deadlines never occurred.
For more information about how deadlines work across stages, see Process Flows Guide.
Tab 3: Locations
Purpose: Manage client addresses and view them on a map
What you'll find:
- All the same components previously accessible via the green Locations button
- Address pins on an interactive map
- Visibility controls for location pins
- Add, edit, and organize location information
Important icon meaning:
- Eye icon always means "hide" - Click to toggle visibility of location pins
- Visibility can be controlled at both the client level and individual pin level
Upcoming features (by end of January 2026):
- Search for addresses
- Find nearby locations
- Closest address suggestions
For complete Locations documentation, see Locations.
Demographics Information Fields
The Demographics tab displays client information organized in a form layout. All data is read-only and sourced from your organization's Electronic Health Record (EHR) system.
Important: Field availability and labels may vary based on your organization's EHR configuration and process-specific requirements. The fields shown below represent common demographics data.
Standard Demographics Fields
The following fields are commonly available across most organizations:
Identification & Basic Information:
- Medical Record Number
- First Name
- Last Name
- Date of Birth (MM/DD/YYYY format)
- Age (in years)
- SSN (Social Security Number)
Contact Information:
- Phone (primary contact number)
- Email (primary email address)
- Address (street, city, state)
- County (of primary address)
- County of Residence / ZIP code
Demographics:
- Sex (biological sex)
- Race (may allow multiple selections)
- Ethnicity (Hispanic/Latino origin)
- Tribal Affiliation (Indigenous/Native American membership)
- Tribal Services (whether client receives tribal-specific services)
- Sexual Orientation
- Gender Identification
Accommodation & Support Needs:
- Disability (type and description)
- Preferred Language (for communication and interpreter services)
Status & Coverage:
- Employment Status (e.g., Employed, Unemployed, Student, Retired)
- Veteran Status (military service history)
- Immigration Status (citizenship/residency information)
- Healthcare Coverage Status (e.g., Insured, Medicaid, Medicare, Uninsured)
Organization & Process-Specific Fields
In addition to standard demographics, your organization may display process-specific fields based on the workflow or program requirements. These fields are also sourced from your EHR system.
Examples of process-specific fields may include:
- Petition Case Number - Court case tracking number
- Petition Filed Date - Date petition was submitted to court
- CARE 100 Received - Date CARE 100 form was received
- CARE 101 Deadline - Deadline for CARE 101 submission
- CARE 101 Sent to the Court - Date CARE 101 was filed
- Initial Hearing Date - Scheduled court hearing date
- Program Status - Current status within specific program (e.g., CARE Status)
Note: The specific fields available depend on:
- Your organization's EHR configuration
- The Process Flow template being used for the case
- Program-specific data requirements
- Regulatory or compliance tracking needs
💡 Tip: If you need additional fields displayed in Conduit, contact your system administrator about EHR integration configuration.
Read-Only Data: Important Notes
All Demographics information is sourced from the connected EHR system and is READ-ONLY within Conduit.
What this means:
- You cannot edit these fields directly in Conduit
- To update client information, changes must be made in the source EHR system
- Updates from the EHR will sync to Conduit
Why this matters:
- Ensures single source of truth (the EHR system)
- Prevents data conflicts between systems
- Maintains data integrity and compliance
If you notice incorrect information:
- Note the discrepancy
- Contact your EHR system administrator or data team
- Request correction in the source EHR system
- Verify the update appears in Conduit after sync
Tips and Best Practices
Review Demographics on Case Open:
- Verify client identification when first opening a case
- Check contact information is current for outreach
- Note preferred language for communication planning
Respect Privacy:
- Demographics contain sensitive personal information
- Only access when necessary for case work
- Follow organizational privacy and HIPAA policies
Cross-Reference with EHR:
- If you have access to the source EHR system, verify critical information matches
- Report any sync issues to technical support
Understand Limitations:
- Remember you cannot edit Demographics in Conduit
- Plan workflows that account for EHR update delays
- Keep your own notes if temporary information is needed
Frequently Asked Questions
Q: Can I edit client information in the Demographics tab?
A: No. All Demographics information is pulled from the connected EHR system and is read-only in Conduit. To update client information, changes must be made in the source EHR system.
Q: What does ELMR stand for?
A: ELMR indicates Electronic Health Records connection. Confirm the exact acronym meaning with your administrator.
Q: How often does Demographics data sync from the EHR?
A: Check with your technical team about the sync schedule between the EHR system and Conduit.
Q: What if I notice incorrect information in Demographics?
A: Contact your EHR system administrator or data team to request corrections in the source EHR system. Once updated there, the changes will sync to Conduit.
Q: What's the difference between Sex and Gender Identification?
A: Sex (field 12) refers to biological sex assigned at birth. Gender Identification (field 20) refers to the client's gender identity, which may differ from biological sex. This distinction is important for respectful, person-centered care.
Q: What if the ELMR chip is missing its green indicator?
A: Missing ELMR chip indicator indicates the case is not connected to Electronic Health Records. Contact your system administrator to establish the connection if health records are needed for the case.
Q: Is SSN always visible or masked?
A: SSN visibility may depend on your user permissions. Some users may see the full number, others may see only the last 4 digits masked (XXX-XX-1234). Check with your administrator about SSN access policies.
Related Documents
- Case Page Overview - Understanding the 4-section Case Page layout
- Locations Overview - Managing client addresses and map views
- Cases Overview - Understanding case concepts
- Activity - Tracking changes in Activity tab